Courses: Introduction to GoldSim:
Unit 5 - Understanding and Working with Elements
Lesson 3 - Understanding GoldSim Outputs
As we have seen in the previous Units, as a general rule, each type of element in GoldSim has one or more inputs (and hence input fields in its properties dialog), and produces one or more outputs. GoldSim models are built by linking the outputs of elements to the input fields of other elements.
For example, the Expression element (which was used in the previous Unit to represent the Inflow_Rate and the Leakage_Rate) has a single input field (the specified Equation), and a single output (the computed value of the specified Equation). On the other hand, the Pool element (which was used in the previous Unit to represent the Tank) has multiple input fields (e.g., Initial Quantity, Lower Bound, Upper Bound, Inflows, Outflows, etc.). In the previous Unit we displayed the primary output of the Pool (the integrated result, which in that case represented the volume of water in the tank). As we will see in subsequent Units, however, the Pool element actually has additional secondary outputs.
All element outputs have three attributes: a type, an order, and dimensions:
- Type: The output type is either a value or a condition. Values are simply numbers. Conditions are Boolean (binary) variables: they have only two states: True or False.
- Order: The order of an output can be a scalar (a single item), a 1-D array (a row or column of items), or a 2-D array (a table of items made up of rows and columns). For this Course, we will assume that all outputs are scalars (single items). Arrays can be extremely powerful and useful, but are an advanced feature. We will briefly discuss the use of arrays in Unit 17.
- Dimensions: Outputs can be assigned dimensions (e.g., length, volume, length/time) which can then be displayed in any units that you choose (e.g., meters, gallons, kilometers/hour). Dimensions can only be assigned to values (not to conditions). Dimensions (e.g., length/time) are assigned by specifying a unit (e.g., meter/second).
Output attributes are important because GoldSim uses them to ensure consistency when you build your model. For example, GoldSim will prevent you from adding two outputs that have different dimensions or multiplying a Value by a Condition. Likewise, if a Pool element has dimensions of volume, GoldSim will ensure that its Initial Quantity input must also be a volume (and its Inflows and Outflows must be a volume/time). For those of you with programming experience, this is analogous to a programming language that is “strongly typed”. Strong typing helps prevent many errors.
These attributes are controlled via the Display Units field and Type… button in the element’s dialog.
For many types of elements (e.g., Data, Expression), you can specify all three attributes. For others, some attributes are fixed and cannot be changed by the user. For most elements, the default type is a value (although, as we shall see, a handful of elements only output conditions). Similarly, for all basic GoldSim elements, the default order is scalar. Finally, for those elements that output a value, in most cases by default the value is dimensionless. For example, for a Data element, the output defaults to a scalar, dimensionless value:
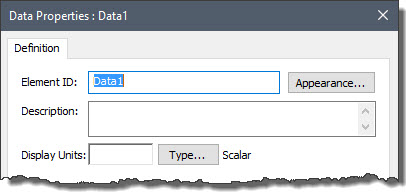
The fact that it is a value (as opposed to a condition) is indicated by the Display Units field being editable (as we will see below, for conditions, this field is grayed out). An empty Display Units field indicates that the output is dimensionless (i.e., has no units). The fact that the output is scalar is indicated immediately to the right of the Type… button.
Open (or create) a Data element in GoldSim right now and press the Type… button. The following dialog will be displayed:
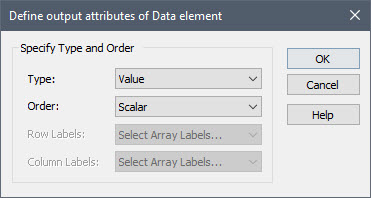
The Type field allows you to select either Value or Condition. The Order field allows you to select Scalar, 1-D Array or 2-D Array. As mentioned above, we won’t deal with arrays in this Course. However, we will deal with conditions soon. So select Condition for the Type and close the dialog by pressing OK. The Data element dialog will now look like this:
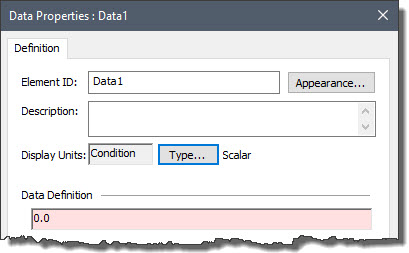
Two things should be noted here:
- The Display Units field is grayed out (and displays “Condition”). Display units do not apply to conditions.
- If you click into the Data Definition field, the field will turn red and display an error message:
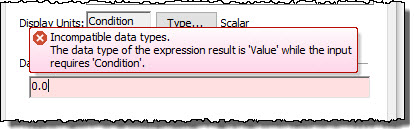
This simply indicates that the input field will not accept a number (a value), since it is expecting a condition. Valid conditions include the words “True” or “False”:
Although it would be poor programming style to do so for a Data element, input fields that accept conditions also accept conditional expressions (i.e., expressions that evaluate to either True or False):
We will revisit conditions and conditional expressions in the next Unit. For now, change your Data element back to a Value. This will put us in a position to start to explore dimensions and units in the next Lesson.