Courses: Introduction to GoldSim:
Unit 7 - Modeling Material Flows
Lesson 11 - Modeling Multiple Withdrawals from a Stock
Recall that in a previous Lesson (Unit 7, Lesson 5), we discussed the importance of referencing the Withdrawal_Rate output of a Reservoir to ensure that the actual, as opposed to requested, withdrawal was used for elements receiving the withdrawal (e.g., other Reservoirs “downstream” from the Reservoir from which that withdrawal was taking place). This was because the Withdrawal_Rate output of a Reservoir (the actual withdrawal) can be less than the Withdrawal Request Rate of Change input (the requested withdrawal) if the Reservoir was at its Lower Bound. (If you don’t recall this discussion, you should review that Lesson now before proceeding).
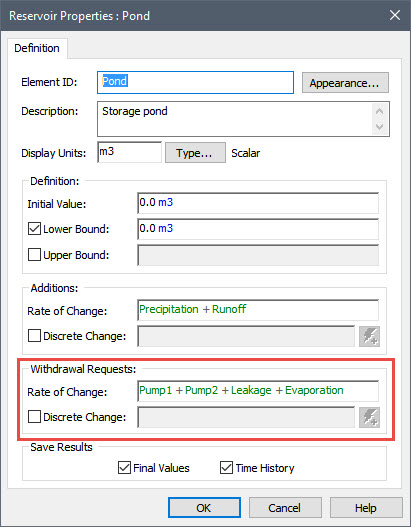
In many real-world situations, however, you will likely have multiple withdrawals from a your Reservoir, with each withdrawal being directed to a different place. For example, if you were simulating a pond, you could imagine having four different withdrawals from the pond:
- Pumping out of the pond using two different pumps (e.g., to two different ponds);
- Leakage out the bottom pond (into the underlying ground); and
- Evaporation (into the atmosphere).
Your Reservoir might look something like this (our focus here is on the Withdrawal Requests):
(Or better yet, you would add the four withdrawals to a Sum element, and enter the Sum into the Withdrawal Request Rate of Change field).
Unfortunately, if you think carefully about this, it should be apparent that using a Reservoir to represent such a system is not straightforward. This is because the Withdrawal_Rate output represents the total withdrawal. So how would we go about correctly computing each of the different withdrawal rates and routing the various withdrawals to the correct location (e.g., Pump1 to one pond, Pump2 to another, Leakage to the groundwater, and Evaporation to the atmosphere)? More importantly, if the Reservoir reaches its lower bound, the actual total withdrawal rate will be constrained (i.e., the total outflow cannot exceed the inflow, so it may be less than the sum of the requested withdrawal rates). In that case, how would we represent the fact that some of the requests have precedence over the others? For example, we have no control over evaporation and leakage (i.e., we can’t turn them off), but we may want to reduce the pumping rate for one pump before the other once the outflow becomes constrained. How do we tell GoldSim to do this?
Such a system can indeed be represented using a Reservoir, but to do so we would need to add some logic (e.g., typically involving use of an Allocator) to make sure we correctly calculate the various outflows under all possible circumstances and route them properly. For some systems, this logic may need to be quite complex.
Therefore, to more easily address complex material management issues like this (which are quite common), GoldSim provides a more powerful Stock element called a Pool. A Pool element is a more powerful version of a Reservoir, and as we shall see in the next Lesson, combines the features of the Reservoir, the Allocator and the Sum into a single element.
In fact, going forward in this Course, we will use a Pool element exclusively for modeling material flows, and will no longer use a Reservoir. This is because although there are some applications for which a Reservoir must be used instead of a Pool, in most real-world cases you will want to use Pool elements whenever modeling material flows.
Note: The Pool element was only added in GoldSim 12. As a result, models built previous to GoldSim 12 that modeled material flows used the Reservoir element. Hence, if you view older models, you will see the Reservoir element used exclusively. Understand that these models will sometimes include some additional logic that would not be necessary if the Reservoirs were replaced by Pools.
The Pool element is described in detail in the next two Lessons.