Courses: Introduction to GoldSim:
Unit 7 - Modeling Material Flows
Lesson 12 - The Pool Element: A More Powerful Reservoir
A Pool is an expanded (and more powerful) version of the Reservoir element. Like a Reservoir, mathematically, what a Pool does is integrate its additions and withdrawals with respect to time in order to compute its value at any time in the future. However, a Pool is different (and hence more powerful) than a Reservoir in three important ways:
- Pools allow you to specify Inflows as separate and individual inputs. (Reservoirs provide only a single input for inflows).
- Pools allow you to specify Requested Outflows as separate and individual inputs. (Reservoirs provide only a single input for a “withdrawal request”). In turn, in addition to providing a “total outflow” output, Pools provide separate and individual outputs for each Requested Outflow. (Reservoirs provide only a single “withdrawal rate” output). This allows you to easily route different outflows to different locations.
- Because Pools allow you to specify multiple Requested Outflows, and it is possible (if the Pool reaches its Lower Bound) that the Pool may not be able to provide the total for all requests, you also specify Priorities for each requested outflow, and the total outflow is then allocated accordingly among the requests if the Pool is unable to provide all of the requests.
In effect, the Pool combines the features of the Reservoir, the Sum and the Allocator into a single element.
The easiest way to start to understand a Pool is to look at an example. We’ve already seen a Pool element in a very simple example earlier in the Course (we used it in the very first model we explored in Units 3 and 4 involving a storage tank). In this Lesson, we will look at a slightly more complicated (but still very simple) example. Let’s open the model now: go to the “Examples” subfolder of the “Basic GoldSim Course” folder you should have downloaded and unzipped to your Desktop, and open a model file named Example2_SimplePool.gsm. We are not going to run this model in this Lesson; we are just going to examine it.
This model simulates the water volume in a tank that has two inflows and three outflows. The model looks like this:
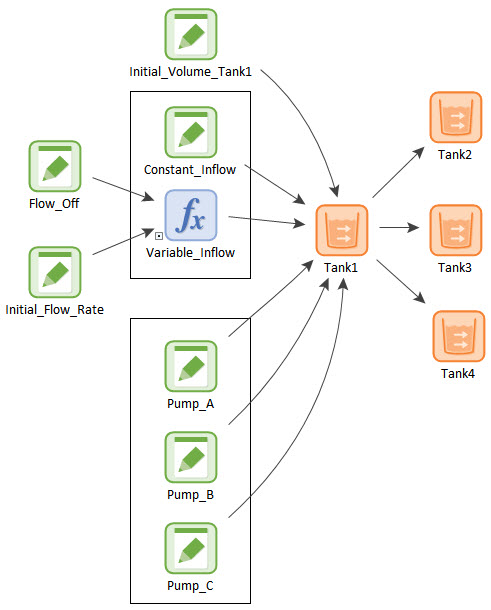
The model is intentionally not very dynamically interesting (one of the inflows changes with time, and the other inflow and all outflows are constant). Don’t worry, we’ll look at models with more complex dynamics later in the Course. The purpose of this model is not to generate interesting dynamics, but simply to get you to understand the basics of using a Pool.
Open up the Pool element named Tank1:

Unlike the Reservoir element, the Pool element has multiple tabs. The default tab is the Definition tab. There are three things worth noting here:
- Most elements in GoldSim require only a single set of Display Units. The Pool element, however, requires two sets of Display Units. The Quantity Units are the units of the quantity being tracked (i.e., in this model the volume of water). In this case, it is liters (abbreviated with the letter “l”). The Flow Units are the units of the inflows and outflows to the Pool. As a result, the dimensions must be those of the Quantity Units divided by time. In this case, it is liters per minute (l/min). We could, however, have specified any units with the dimensions of volume per time (e.g., m3/day).
- You specify the Initial Quantity, and the (optional) Lower Bound and Upper Bound here.
- The Definition tab also contains a “Discrete Additions & Withdrawals” section. The Reservoir element also had these same inputs. These inputs provide a mechanism to model “discrete” (sudden) changes to the volume. We will discuss these in detail in Unit 13.
Now click on the Inflows tab. It looks like this:
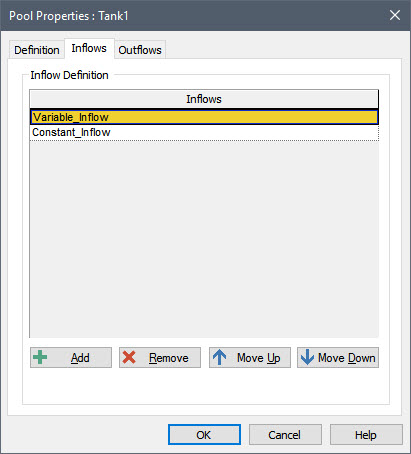
You can add and delete inflows, and organize them into any order by moving them up and down the list.
Recall that in a Reservoir, inflows must be entered into the Additions Rate of Change field:
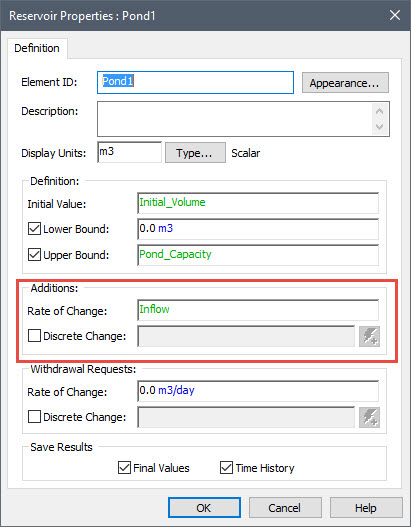
Although this may work fine for one inflow, once you have multiple inflows, you would need to either write an expression adding the inflows (or use a Sum element, and link it here). By allowing you to easily create a list of inflows (effectively incorporating a Sum element into the Pool element), the Pool makes it much easier to organize the inflows in a clear and concise way (e.g., so it will be more obvious if something was omitted).
Now click on the Outflows tab. It looks like this:
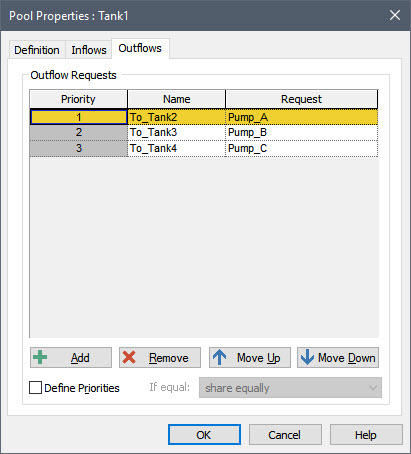
The three outflow requests are listed here. The Request column contains the actual link to the outflow request. The Name column allows you to assign a customized name to each outflow request. (We’ll wait to discuss the Priority column until the next Lesson).
You can add and delete outflows, and organize them into any order by moving them up and down the list.
Pools have the following outputs:
- The quantity in the Pool (the primary output, having the same name as the element);
- The Total_Inflow to the Pool (simply the sum of all the Inflows);
- The Total_Request from the Pool (simply the sum of all the Requested Outflows);
- The Total_Outflow from the Pool (which is always less than or equal to the Total_Request); and
- Each individual Outflow from the Pool (whose names are user-defined in the Outflows tab).
- The Overflow from the Pool (only available if an Upper Bound is defined);
- Is_Full, a condition indicating whether or not the Pool is at its upper bound (only available if an Upper Bound is defined).
Note that the Total_Outflow output for a Pool is equivalent to the Withdrawal_Rate output for a Reservoir.
You can see these outputs in the output interface for the element by left-clicking on the output port (since no Upper Bound is defined, there are no Overflow and Is_Full outputs):
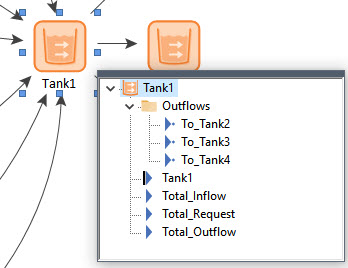
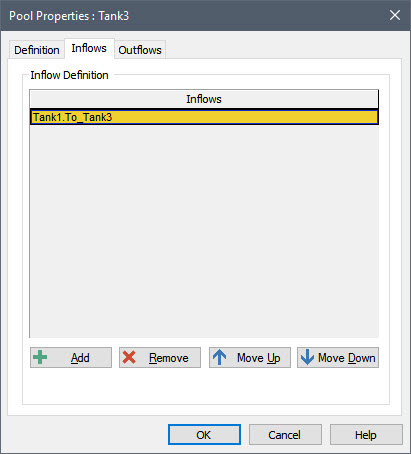
Note that all of the individual Outflows are separate outputs (contained in a folder) and their names are user-defined. This is very powerful, because it allows you to easily route these outflows to different locations in a very transparent way. You will see, for example that the To_Tank3 output is being routed directly to the Tank3 Pool element. You can see this by opening Tank3 and clicking on the Inflows tab:
It should be clear from this very simple model that compared to a Reservoir element, a Pool element makes it much easier to manage the inflows and outflows for a Stock of material (in this example, water). Not only does it make it easier to organize the inflows and outflows, but it provides a separate output for each outflow, making it easy to route each outflow to a different destination. These features alone make a Pool more powerful than a Reservoir.
However, there is an additional feature that makes the Pool even more powerful. Recall from the previous Lesson that we noted that if a Reservoir reaches its lower bound, the actual total withdrawal rate will be constrained (i.e., the total outflow cannot exceed the inflow, so it may be less than the sum of the requested withdrawal rates). In that case, how do we represent the fact that some of the outflow requests have precedence over the others? For example, we may want to reduce the pumping rate for one pump before the others once the outflow becomes constrained. How do we tell GoldSim to do this? When using Reservoirs, this requires adding logic (using additional elements). As we will see in the next Lesson, the Pool provides the ability to do this directly.