Courses: Introduction to GoldSim:
Unit 6 - Carrying Out a Dynamic Simulation
Lesson 11 - Exercise: Using a Selector
We are now ready to do our next Exercise. We are going to start with the model we built in the previous Exercise. You should have saved that model and named it Exercise2.gsm. Open the model now. (If you failed to save that model, you can find the Exercise, named Exercise2_Cumulative_Runoff.gsm, in the “Exercises” subfolder of the “Basic GoldSim Course” folder you should have downloaded and unzipped to your Desktop.)
Recall that in that model, we calculated the volumetric runoff rate (volume/time) during a rainfall event and then calculated the cumulative volume of water that ran off over a 48 hour period (by using a Reservoir).
In that Exercise, the rainfall rate was constant. In this Exercise, we will make the rainfall rate vary with time. In particular, we will assume the following:
- Rain does not begin falling until after 10 days, at which time it falls at 60 mm/day
- At 15 days, the rainfall rate doubles to 120 mm/day
- At 20 days, it stops raining.
We would like to run the model for 50 days and accumulate the runoff.
For this Exercise, we want you to use a Selector to implement this. As we will learn in a subsequent Unit, there is actually a much easier way to implement this without using a Selector. But this provides a rather simple example of nested if-then logic, so we will use a Selector for now, and improve the model in a subsequent Exercise.
So to create this model, you will need to delete the Data element that represents the rainfall rate and replace it with a Selector. The Selector will need to reference the elapsed time (ETime). Also, in the simulation settings, don’t forget to change the Duration to 50 days. Use a 1 day Basic Step, and set the Time Display Units to day.
Stop now and try to build and run the model.
Once you are done with your model, save it to the “MyModels” subfolder of the “Basic GoldSim Course” folder on your desktop (call it Exercise3.gsm), as we will continue to explore this model in the next Lesson. If, and only if, you get stuck, open and look at the worked out Exercise (Exercise3_Selector_Runoff.gsm in the “Exercises” subfolder) to help you finish the model.
Now let’s look at the Selector element that you added. There are actually two ways to build this model using a Selector: the quick way and the better way. Let’s look at the quick way first. If you did it the quick way, your Selector should look something like this:
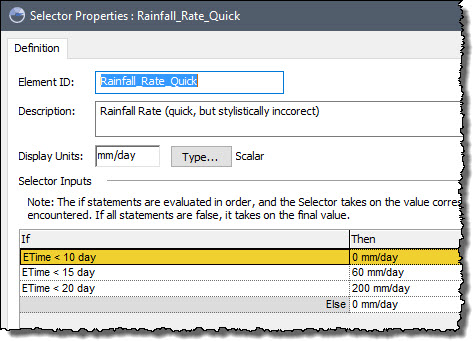
The key to understanding this is to recall that the statements are evaluated in order, and the Selector takes on the value corresponding the first True statement that is encountered. Obviously, during the first 10 days, the value is 0 mm/day. Between 10 and 15 days, the value is 60 mm/day. Between 15 days and 20 days, the value is 120 mm/day. After 20 days, it is equal to 0 mm/day. We could have been more explicit in this regard, by writing the conditions as follows:

However, this is unnecessary. The first portion of the second and third statements is redundant. That is, when evaluating “ETime >= 10 day and ETime < 15 day”, the term “ETime >= 10 day” is redundant because we know it must be true. If it was false, the first statement would have been selected, and the Selector would not even have bothered to evaluate the second statement.
As we alluded to above, defining the Selector this way, while quick and not technically incorrect (it will produce the correct answer), is stylistically incorrect. Why? Because it buries input variables (10 day, 15 day, 20 day, 60 mm/day, 120 mm/day) directly inside the element. All inputs in a model should always be entered using input elements (e.g., Data elements). This makes the model more transparent, and less likely to contain errors. For example, assume that the 10 day value (the time rainfall starts) needed to be used in two different places in the model (in this Selector, and someplace else). By defining this time as a Data element, you could simply reference the same Data element in both places. If you needed to change the value, you would only need to change it in one place.
Hence, the correct model structure should look something like this:
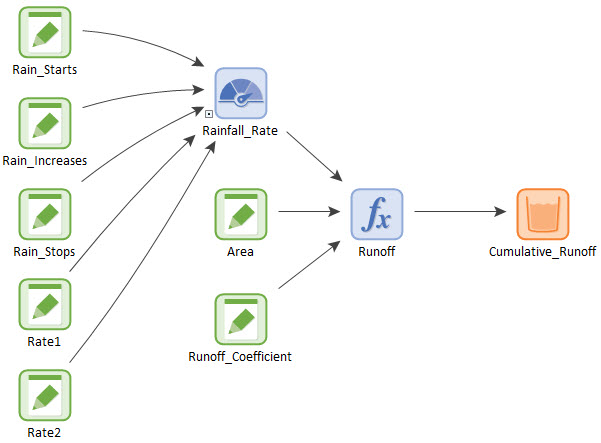
And the Selector should look like this:

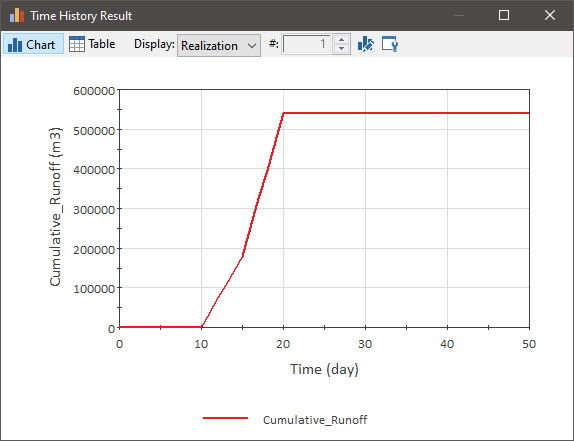
If you run the model and plot a time history for the Reservoir (right-click on the element, and select Time History Result…), the chart should look like this:
Once you are happy with this file, remember to save it to the “MyModels” subfolder of the “Basic GoldSim Course” folder on your desktop (call it Exercise3.gsm). We will explore the results of this model in the next Lesson.