Courses: Introduction to GoldSim:
Unit 6 - Carrying Out a Dynamic Simulation
Lesson 13 - Exporting from a Time History Result Element
In some cases, rather than using the result plotting and post-processing capabilities provided by GoldSim, you may wish to plot, analyze, or store the results using a separate program, such as a spreadsheet, a database, or statistical analysis package. To facilitate this, GoldSim provides several mechanisms that allow you to export results.
In this Lesson, we are going to talk about exporting time history results. To do so, open the Exercise we worked with in the previous Lesson (Exercise3.gsm). If you don’t have this, open and look at the worked out Exercise (Exercise3_Selector_Runoff.gsm) in the “Exercises” subfolder of the “Basic GoldSim Course” folder on your desktop.
Run the model and double-click on the Time History Result element to view the result. Then press the Table button to view the result as a table:
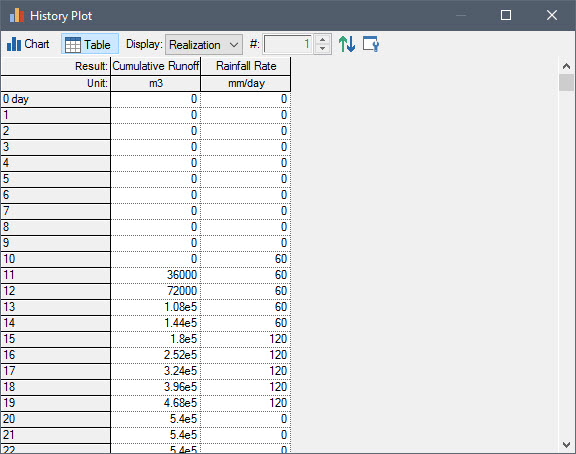
One way to export this time history data is to simply cut and paste it from here to a spreadsheet. You can do this quite easily. If you left-click in the upper left-hand cell (“Result:”), the entire table will be selected. If you then press Ctrl+C, it will be copied to the Windows clipboard. Opening Microsoft Excel, placing your cursor in a cell and pressing Ctrl+V will then paste the results into a spreadsheet.
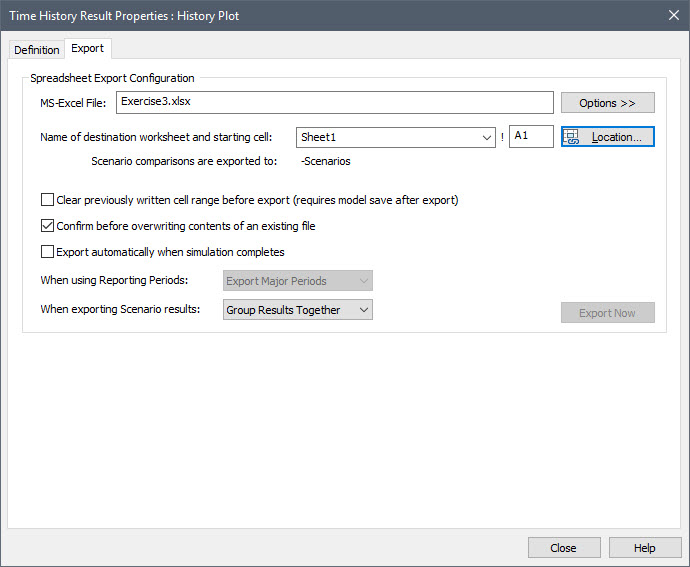
A more powerful way to do this is to tell GoldSim to automatically export the data to a specified spreadsheet after the simulation completes. Let’s do that now (obviously, this Lesson assumes you have access to Microsoft Excel). To set this up, first open Excel and save an empty spreadsheet (in the “Exercises” subfolder) named Exercise3.xlsx.
Now return to GoldSim, close the Time History Result element, return to Edit Mode, and double-click on the Time History Result element again to view the Properties dialog:
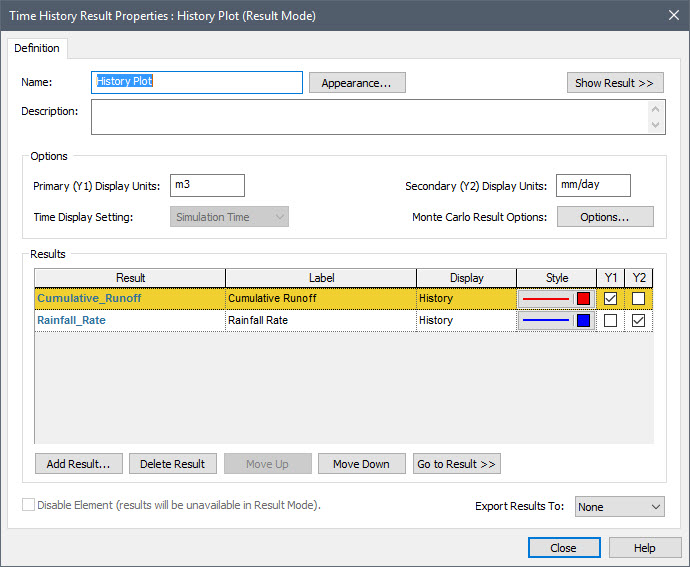
In the lower right-hand corner is a drop list named Export Results To. Select “MS-Excel File”. When you do so, a new tab (Export) will be added to the dialog. Let’s look at that tab:
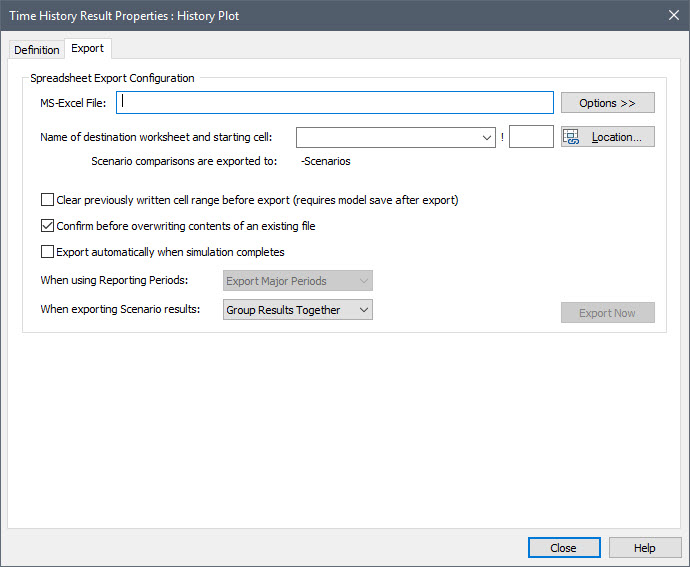
The first thing we need to do is specify the spreadsheet. You do this by pressing the Options>> button, selecting “Select existing MS-Excel file…”, and browsing to the spreadsheet and selecting it. Next we need to specify where in the spreadsheet the results are to be exported. The easiest way to do this is to press the Location button. When you do this, it will open the spreadsheet. Select the cell where you want the result export to start (e.g., A1).
You will note a small dialog titled “GoldSim – Excel Location Selection”:
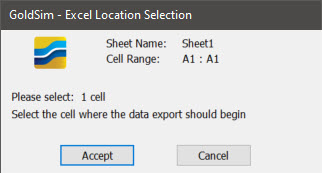
Press the Accept button. When you do so, GoldSim will insert the Sheet and Start Cell information.
After doing so, the Export tab will look like this:
There are a number of options here that you can ignore (you can read more about them in GoldSim Help).
The only one we will change is Export automatically when simulation completes. Let’s check this box. If we leave it cleared, in order to export the results, we would need to return to this tab after running the model and press Export Now. By checking it, we are telling GoldSim to automatically export the results at the end of the simulation.
Close the dialog and run the model. After running, a dialog will appear telling you that the spreadsheet file exists, asking if you want to overwrite it. Select Yes.
Note: One of the options that we did not mention above but is discussed in detail in GoldSim Help is to create the Excel file “on the fly” rather than exporting to an existing file. When you do this, you can even tell GoldSim to automatically use information like the GoldSim file name and date and/or time to name the file.
Now go to the Excel file and open it. You will see that GoldSim successfully exported the results to the file:
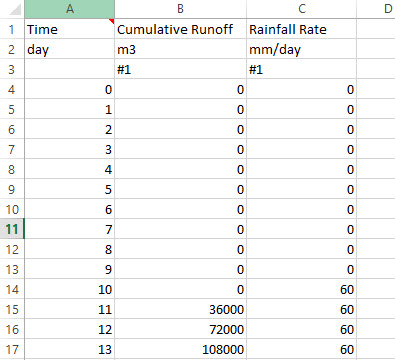
You will also note that the first cell contains a comment with information regarding the run that produced the results (e.g., GoldSim version, GoldSim filename, etc.).
We will reuse this file again in the next Unit, so let’s remove the results export before we close this file:
- Return to Edit Mode (e.g., by pressing F4).
- Open the Time History Result element.
- In the lower right-hand corner of the dialog, set Export Results To back to “None”.
- Close the dialog and save the file.