Courses: Introduction to GoldSim:
Unit 3 - Exploring and Running a Simple Model
Lesson 4 - Selecting GoldSim Commands Using Context Menus and Toolbars
When you right-click on an element in the graphics pane, a menu with only the commands that can be executed with respect to that particular element is displayed. This is called a context menu.
If you right-click within empty space in the graphics pane, a general context menu for the graphics pane is displayed:
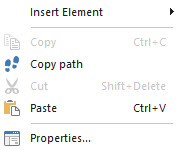
Context menus are the easiest and fastest way to access frequently used commands in GoldSim.
You can also choose many GoldSim commands from a toolbar. You have already used a toolbar button in the previous Lesson (to turn the browser on and off). If a toolbar command is not available, the button for it is grayed out. If the command is active, the button appears “pushed”. Many GoldSim commands are also available from the GoldSim main menu bar.
Let's now practice opening a context menu for an element.
- In the graphics pane, right-click on the element named “Tank”. This context menu is displayed:
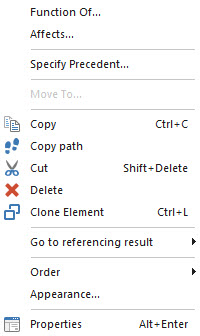
- This menu has commands you can use to determine where the Tank outputs are used, and which elements are inputs to the Tank. It also includes commands for copying and pasting, and changing the appearance of the element, as well as a command that allows you to view the properties of the element. Commands that open a dialog have three dots, while commands that open another menu have an arrow. You can click anywhere outside a context menu to close it.
GoldSim models are built by inserting elements. To see a list of all of the element categories, right-click on an empty section of the graphics pane and select (i.e., left-click on) Insert Element from the context menu that appears. Once you select the category of element you want, another menu is displayed to show you the elements that are available within that category:
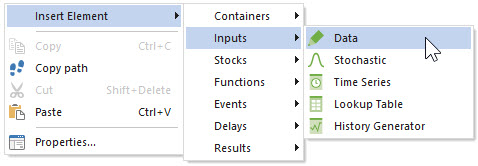
To insert an element, you simply left-click on the element type you want, and it is inserted in the graphics pane at the point where you initially clicked to bring up the context menu.
However, don't insert any elements yet! We will insert elements (in fact, rebuild this entire model) in the next Unit.
Note: As we shall see, in addition to inserting elements as shown above, you can also insert elements using toolbar buttons.