Courses: The GoldSim Contaminant Transport Module:
Unit 7 - Modeling Complex Transport Processes in Environmental Compartments
Lesson 3 – Exercise: Modeling a Pond with a Changing Volume
In this Lesson, we will work on a simple Exercise to simulate a Cell whose volume is changing with time.
The model consists of a single tank with a constant inflow and a constant outflow. The outflow is greater than the inflow, and hence the volume will drop. Mass is enters the tank via the inflow at a constant concentration.
The input parameters describing this system are summarized below:
| Variable | Value |
|---|---|
| Initial Volume of in Tank | 10 m3 |
| Inflow Rate | 0.1 m3/day |
| Outflow Rate | 0.175 m3/day |
| Inflow Concentration | 100 mg/l |
To build this model, create a new model and follow these steps:
- Edit the Species element to change the name of the single species from Species1 to X.
- Create four Data elements for the inputs in the table above. Note that the inflow concentration should be defined as a vector of species.
- Create a Pool element with the appropriate initial volume, inflow and outflow.
- Create a Cell (named Tank). The amount of water should be defined by the Pool.
- Create a Cell (named Source) with an arbitrarily constant volume (e.g., 1 m3) and create an Outflow from this Cell to the Tank (with a flow rate defined by the Inflow Rate element).
- Create a Cell (named Sink) with an arbitrarily constant volume (e.g., 1 m3).
- Create an Outflow from the Tank Cell to the Sink Cell (with a flow rate defined by the Outflow output of the Pool).
- We will run the model for 100 days with a 1 day timestep (the default settings).
Stop now and try to build the model.
Once you are done with your model, save it to the “MyModels” subfolder of the “Contaminant Transport Course” folder on your desktop (call it ExerciseCT7.gsm). If, and only if, you get stuck, open and look at the worked out Exercise (ExerciseCT7_Changing_Volume.gsm in the “Exercises” subfolder) to help you finish the model.
Let’s walk through the model now.
The system should look like this:
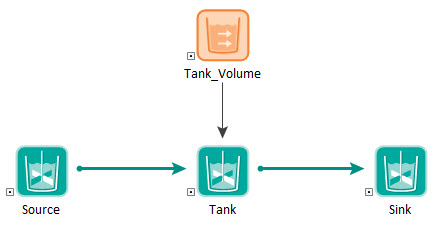
A critical point is how the Outflow from Tank to Sink is defined:
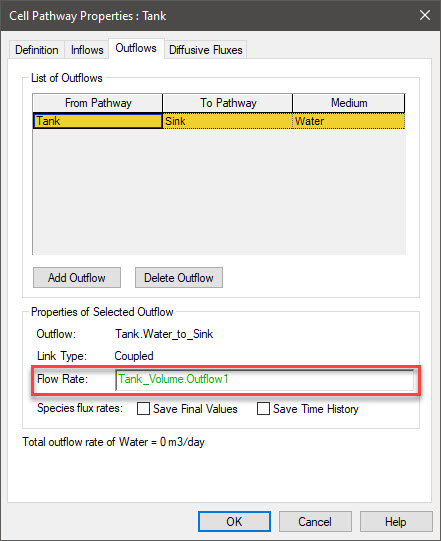
The rate is defined as the output of the Pool element. This is the actual outflow (as opposed to the requested outflow). As discussed in Unit 7 of the Basic Course, requested withdrawals/outflows from a Pool or Reservoir are not necessarily the same as the actual withdrawals/outflows. In particular, if the Pool or Reservoir hits its Lower Bound, the actual withdrawal/outflow can be lower than the requested value. Hence, it is critical when linking Pools and Reservoirs to Cells that you specify flow rates appropriately. In this case, the outflow from the Pool is defined as follows:
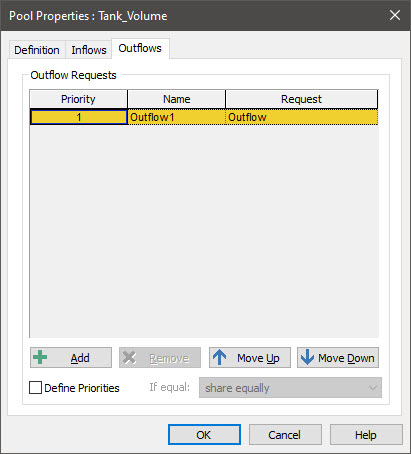
The output of the Pool named “Outflow1” (which was the default name) was defined by the Data element named Outflow (which represents the requested outflow). When we created the Outflow from the Pond Cell to the Sink Cell, we referenced this output (Tank_Volume.Outflow1), which always represents the actual outflow, rather than referencing the requested outflow.
Run the model and plot the volume in the tank. It should look like this:
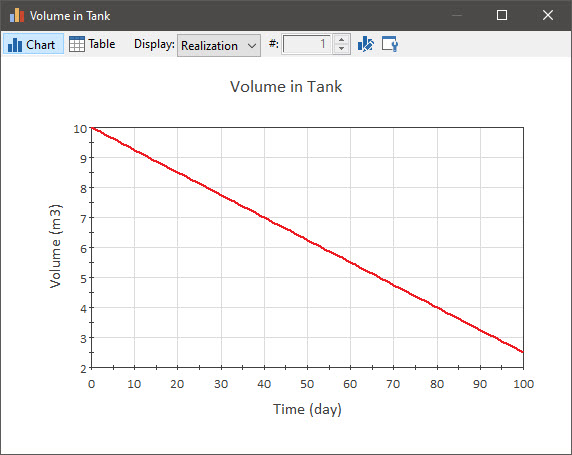
The volume is steadily decreasing.
Now plot the mass and concentration in the Tank on the same plot. Since these are both vectors, you need to do this in a particular way to avoid the lines having the same color. This was discussed in detail in Unit 6, Lesson 4. After you do so, turn this into a Result element. The plot should look like this:
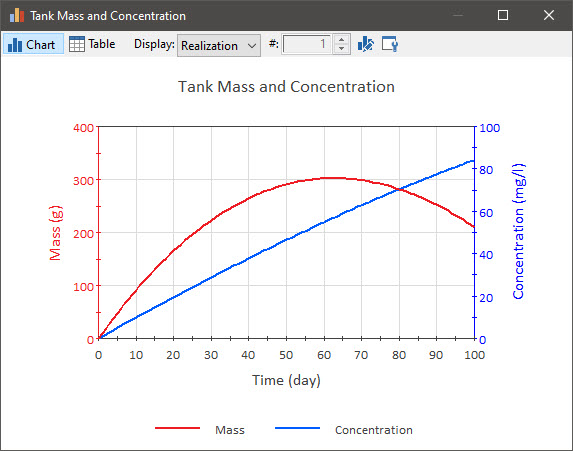
First, let’s focus on the concentration. It is increasing with time (although not linearly). Since the inflow concentration is 100 mg/l, if the Cell reached a steady-state concentration, it would eventually equal that concentration.
The mass plot is a bit complex. We are adding mass at a constant rate, but the rate at which mass is leaving is increasing with time (it is equal to the outflow rate, which is a constant, times the concentration, which is increasing). Eventually, the rate at which mass is leaving exceeds that at which it is being added, and the mass starts to decrease (although the concentration increases – recall that the volume is decreasing).
Make sure to save this model to the “MyModels” subfolder of the “Contaminant Transport Course” folder on your desktop (ExerciseCT7.gsm). We will revisit it in the next Lesson.
