Courses: Introduction to GoldSim:
Unit 15 - Modeling Scenarios
Lesson 4 - Understanding the Active Scenario
In this Lesson, we will continue to explore the Example model you modified in the previous Lesson. If that model is not already opened, you should do so now (you should have saved it to the "MyModels" subfolder in the “GoldSim Course” folder on your desktop as Adding_Scenarios.gsm).
Let’s start by double-clicking on the Evaporation_Rate element:

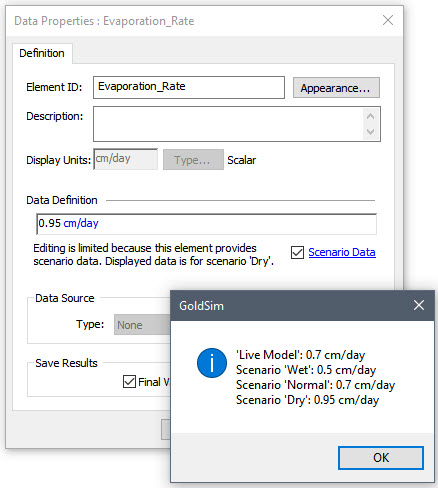
If you click on Scenario Data (the label, not the checkbox itself) a dialog will be displayed indicating the values used for each scenario:
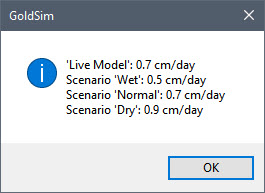
Although this lists the values for all of the scenarios, like all Data elements, within the Data Definition field itself, a Scenario Data element displays a single value. That is, it cannot display the value for all scenarios; it can only show you the value for one scenario at a time. The dialog indicates which scenario is being displayed (in the example above, the “Live Model” is being displayed). The “Live Model” can be thought of as a “scratch” scenario, or a temporary placeholder scenario where you can experiment before saving something as an actual scenario. When comparing scenario results, only defined scenarios are shown (the “Live Model” is not included in the comparison). We will discuss how the “Live Model” can be used in a subsequent Lesson.
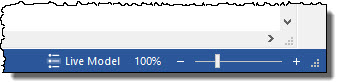
In the current model, when we look at the Data element, it indicates that the data being displayed is for the “Live Model”. In this case, this means that the “Live Model” is the Active Scenario. The Active Scenario is the scenario that is being viewed when you are browsing a model. That is, whenever a model has scenarios, one of the scenarios is the Active Scenario. The Active Scenario is indicated in the lower right-hand corner of the GoldSim status bar:
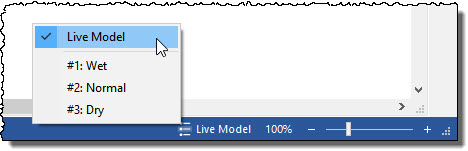
If you click on this portion of the status bar (the three horizontal lines just to the left of “Live Model”), GoldSim will display all of the scenarios (and you can select one to become the Active Scenario):
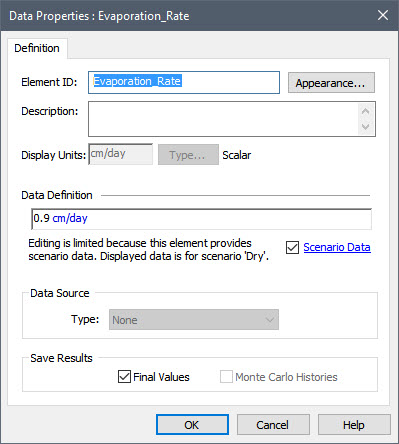
Let’s change the Active Scenario to “Dry” (by selecting it in this menu). After doing so, open the Evaporation_Rate element again and you will notice that it now displays the value for the “Dry” scenario:
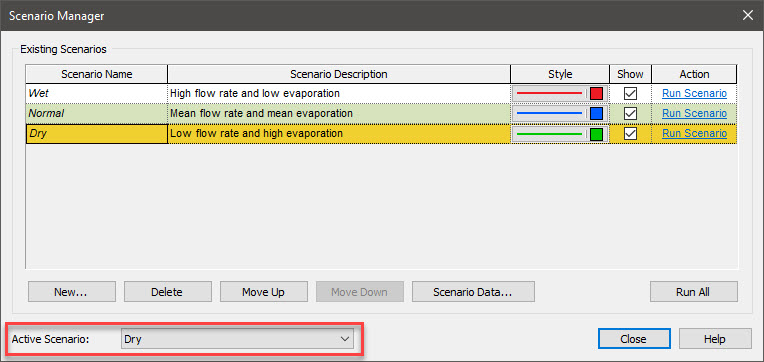
You can also select the Active Scenario directly from within the Scenario Manager. You will notice a drop-list at the bottom of the dialog:
Now that we understand how to specify the Active Scenario, what do we do with it? The primary thing to note is that you can change the value for the Active Scenario directly in the Data element (rather than using the Scenario Data dialog). To see this, open the Evaporation_Rate element again. As noted above, it now displays the value for the “Dry” scenario. In the Data Definition field, you can change that value (e.g., from 0.9 cm/sec to 0.95 cm/sec), and you can verify that it has been changed by clicking on Scenario Data (the label, not the checkbox itself):
There is another important aspect of the Active Scenario that we will discuss in a subsequent Lesson.
Again, we will continue to explore this model in the next Lesson, so you should save the model (as Adding_Scenarios.gsm) to the “MyModels” subfolder in the “GoldSim Course” folder on your desktop.
Before doing so, however, change the value for the Evaporation_Rate for the “Dry” scenario back to 0.9 cm/day.