Courses: Introduction to GoldSim:
Unit 15 - Modeling Scenarios
Lesson 7 - Editing Scenarios and Adding New Scenarios
In this Lesson, we will continue to explore the Example model you modified in the previous Lesson. If that model is not already opened, you should do so now (you should have saved it to the “MyModels” subfolder in the “GoldSim Course” folder on your desktop as Adding_Scenarios.gsm).
The model should be in Scenario Mode and all three scenarios should have results.
Now that we have learned how to create, run and compare scenarios, in this Lesson we will discuss how to edit existing scenarios, and add new scenarios.
Let’s start by going to the Scenario Manager (F7):
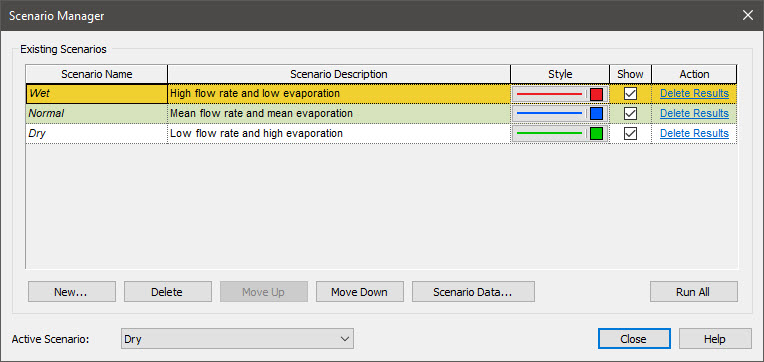
Press Delete Results for the “Normal” scenario. Then press Scenario Data… You can now change either of the values for the “Normal” scenario. Change the Evaporation_Rate from 0.7 cm/day to 0.75 cm/day.
Note: You can only edit values in the Scenario Data dialog for scenarios that do not have results. As a result, you will not be able to edit the values for the other scenarios (since they have results).
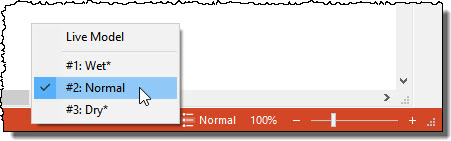
This, however, is not the only way you can edit a scenario. You can also edit the Scenario Data element directly. Close the Scenario Data and Scenario Manager dialogs. Recall that we deleted results for the “Normal” scenario. So this is the only scenario we can edit. In order to edit a Scenario Data element directly, we need to change the Active Scenario to the one we want to edit. So go to the Status bar select “Normal” as the Active Scenario:
After doing so, open the Mean_Inflow element:

You can change this value here. Change it from 7 m3/day to 6.5 m3/day.
As can be seen, unlike Result Mode, in Scenario Mode, you can edit Scenario Data elements for scenarios that do not have scenario results (i.e., if the Active Scenario does not have results, Scenario Data for that scenario can be edited).
Note: Although you can edit Scenario Data elements for an Active Scenario that does not have results while in Scenario Mode, you can never edit other kinds of elements in Scenario Mode, since these are common to all scenarios, and doing so would invalidate scenario results that existed for other scenarios. You can, however, change any existing Data element to Scenario Data (by checking the Scenario Data box in its dialog), and subsequently edit its value for any scenario that does not have results.
Return to the Scenario Manager (F7) and press Run Scenario for the “Normal” scenario to generate results for that scenario again.
Now that we have three scenarios, what if we wanted to create a fourth scenario? One way to do that would be to simply press New… from the Scenario Manager dialog. Let’s do that now. You will be prompted for a Scenario ID and Description. Specify the following:
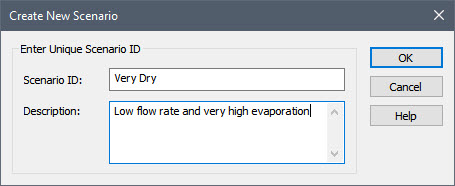
Press OK and this will add a new scenario. Next we need to define the Data values. Press the Scenario Data… button:
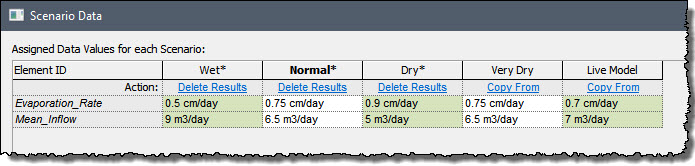
You will see that another column (for the new scenario) has been added. The values default to the values for the Active Scenario. Change the Evaporation_Rate to 1 cm/day and the Mean_Inflow to 5 m3/day. Close the Scenario Data dialog and press Run Scenario for the “Very Dry” scenario to generate results for that scenario.
Now we are going to add a fifth scenario in a different way. Often when you are doing scenario modeling you may want to run the model multiple times, experimenting with various inputs, before you decide to save the set of inputs as a scenario. That is what the “Live Model” is for. The “Live Model” can be thought of as a “scratch” scenario, or a temporary placeholder scenario where you can experiment before saving something as an actual scenario. When comparing scenario results, only defined scenarios are shown (the “Live Model” is not included in the comparison).
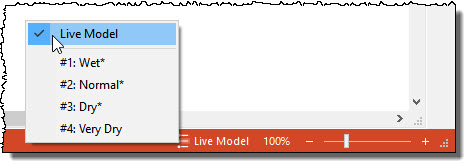
To see how you can use the “Live Model”, close the Scenario Manager dialog now. Then go to the Status bar and click on the icon to display all the scenarios. While this menu is open, select “Live Model”:
Now edit the Mean_Inflow and change its value to 10 m3/day and edit the Evaporation_Rate and change its value to 0.4 cm/day. Then press F5 to run the model (and place the model in Result Mode). Let’s say you had done this several times, and were now happy with the results. You now wanted to save the information in “Live Model” as a scenario. To do so, press F4. The following dialog will be displayed:
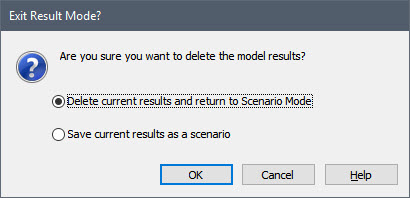
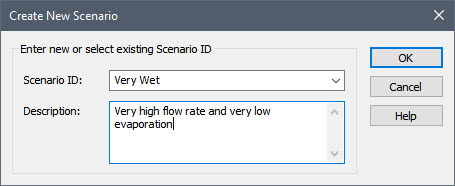
Select the second option (“Save current results as a scenario”) and press OK. You will be prompted for a Scenario ID and Description. Enter the following:
Now open the Time History Result element (and select “Realization” for Display). You will now see that all five scenarios are displayed:

You should now have a pretty good understanding of how to add and edit scenarios.
Before we close this Lesson, however, we need to briefly discuss one final topic with regard to scenarios. To do so, we need to open another example model. Close the current model (we won’t be using it any more), and open up the very first model we looked at in this Course: Example1_Tank.gsm (which you will find in the “Examples” subfolder of the “Basic GoldSim Course” folder on your Desktop).
This model, of course, has no scenarios.
Run the model, and then press F4 to display this dialog:
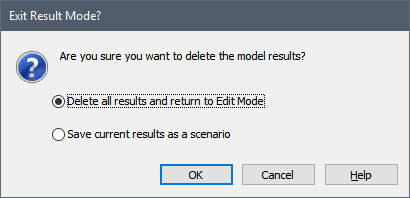
In the previous Units in this Course, we’ve seen this dialog every time we wanted to return to Edit Mode. We always accepted the default option (“Delete all results and return to Edit Mode”). But what happens if we select the second option (“Save current results as a scenario”)? Try it now. When you do so, you will be prompted for a Scenario ID and Description, and the model will be placed in Scenario Mode (with the Active Scenario set to “Live Model”). Hence, what we have done is added a scenario. Moreover, the Active Scenario is set to “Live Model”, so you could change some inputs, run the model again, press F4, and choose to “Save current results as a scenario”. This allows you to quickly add (and run) scenarios, without ever having to use the Scenario Manager.