Courses: Introduction to GoldSim:
Unit 15 - Modeling Scenarios
Lesson 6 - Comparing Scenario Results
In this Lesson, we will continue to explore the Example model you modified in the previous Lesson. If that model is not already opened, you should do so now (you should have saved it to the "MyModels" subfolder in the “GoldSim Course” folder on your desktop as Adding_Scenarios.gsm).
Make sure that the model is in Scenario Mode and all three scenarios have results (that is the state we left it in at the end of the previous Lesson).
Once a model is in Scenario Mode, if you browse the model, you will note the following:
- If you browse to a Scenario Data element, it will display the value for the Active Scenario.
- There is no option to right-click on an element and view its results. Elements do not store results in Scenario Mode.
- If you double-click on a Time History Result element, a Final Value Result element or a Distribution Result element, GoldSim displays results for all scenarios for which scenario results have been generated. That is, you will use Time History, Final Value and Distribution Result elements to compare scenario results.
Note: You can choose to hide a particular scenario from displaying in Time History and Distribution Result elements by clearing the Show button for that scenario in the Scenario Manager.
Double-click on the Time History Result element now:

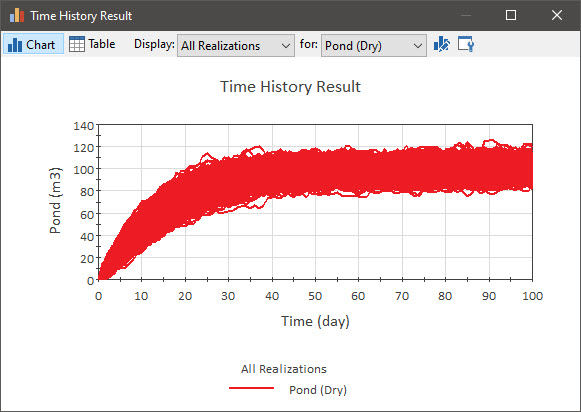
It turns out that the model was set up to run for 1000 realizations (i.e., each scenario was run for 1000 realizations). Since we have run multiple realizations for the various scenarios, what is shown is a function of what has been selected from the Display list. In particular, if “Realization”, “Statistic”, or “Custom Statistics” is selected, GoldSim shows the selected result for each scenario. This is possible because in these three cases, there is only one set of results to display for each scenario.
However, if “All Realizations” or “Probabilities” is selected, only one scenario can be viewed at a time, and it is necessary to select which scenario you wish to view, since these two displays require multiple sets of results for each scenario (e.g., all realizations for a selected scenario) and it would not be possible to show all of this information in a meaningful way for multiple scenarios. For example, if we select “All Realizations” from the Display list, we must select which scenario we want to view from the for list (here we are showing the “Dry” scenario):
Now double-click on the Distribution Result element:
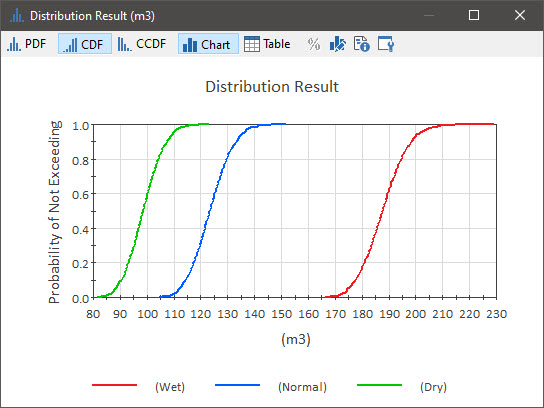
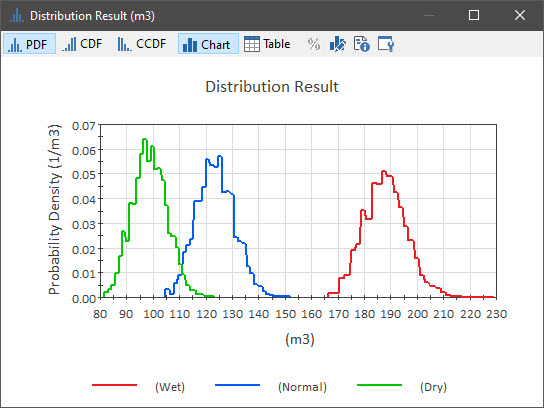
In this case, we see the probability distributions of the output (the Pond volume) for all three scenarios. And, of course, we can view these in other ways (e.g., as a PDF):
Finally, you will note that there is also a Final Value Result element in this model (we introduced this type of result in Unit 7, Lesson 8). Final Value results provide a variety of ways to view scenarios. When you double-click on it, it will look like this:
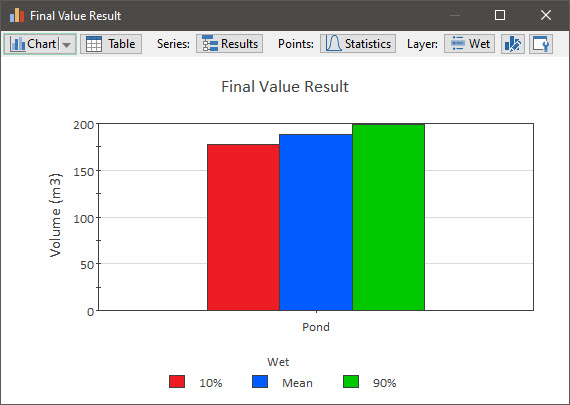
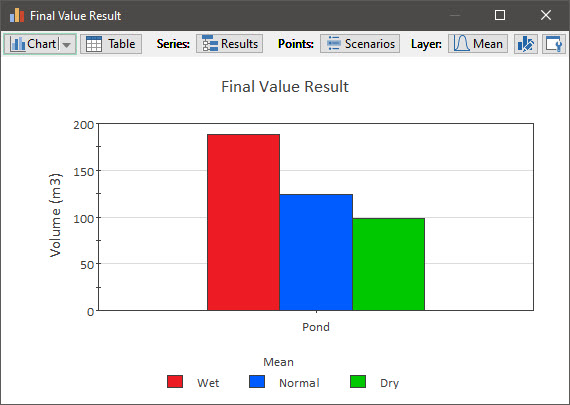
This default view is showing a clustered column chart of three statistics (the 10th percentile, mean and 90th percentile) for a single scenario (Wet). These statistics are displayed because the model was specifically set up to show these statistics for Final Value results.
We can easily change this display. For example, you could look at these same result for the other scenarios by selecting them from the Layer drop-list. Instead, however, for Points, select "All Scenarios" and for Layer, select "Mean". Here we see the mean Final Values of all three scenarios displayed:
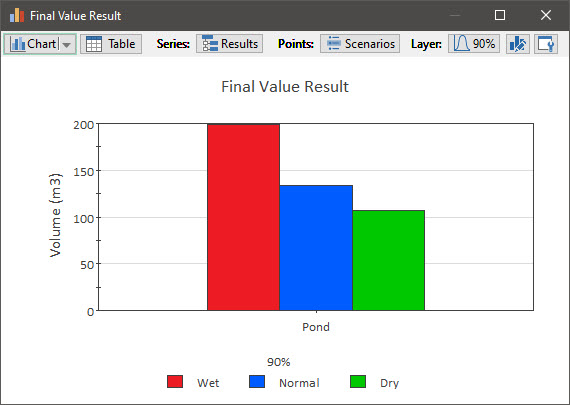
Because the model was set up to display two other statistics for Final Value results, we could also display these (here is the 90th percentile for the three scenarios):
As pointed out above, when in Scenario Mode, scenario results can only be viewed in Time History Result elements, Distribution Result elements and Final Value Result elements. No other results are available. Often, however, in addition to comparing scenario results, you may want to look at the detailed results for a single scenario. To do so, you must select the scenario of interest as the Active Scenario, and then run the model in the standard way (e.g., by pressing F5). This places the model in Result Mode for the Active Scenario. Let’s do that now (i.e., press F5). The model will be placed in Result Mode (for the “Wet” scenario). All results are available to view.
It is important to understand, however, that the scenario results for the other scenarios that existed prior to entering Result Mode for the “Wet” scenario are still saved in the file. Hence, we can view these again by returning to Scenario Mode. To see this, press F4 from Result Mode and we will be presented with this dialog:
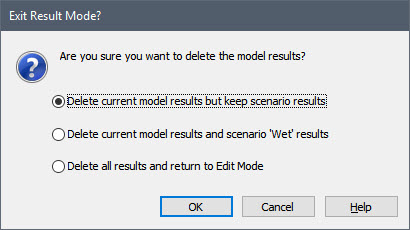
Accept the first (default) option, and you will be returned to Scenario Mode where the results for all three scenarios are still available in the Result elements. (You can double-click on the Result elements to verify this).
At this point, it is worthwhile to summarize the differences between Result Mode and Scenario Mode:
- When in Scenario Mode, scenario results can only be viewed in Time History Result elements, Final Value Result elements and Distribution Result elements. No other results are available. Hence, if your model does not contain any Time History, Final Value or Distribution Result elements, you will not be able to compare scenario results.
- By definition, a model can only be in Scenario Mode if it has at least one scenario with results. However, when in Scenario Mode, not all scenarios necessarily have results (since the scenarios can be run independently).
- Models cannot be edited in Result Mode. However, as we will discuss in the next Lesson, in Scenario Mode, you can edit Scenario Data elements for scenarios that do not have scenario results (i.e., if the Active Scenario does not have results, Scenario Data for that scenario can be edited).
Because we will continue to explore this model in the next Lesson, you should save the model again (as Adding_Scenarios.gsm) to the “MyModels” subfolder in the “GoldSim Course” folder on your desktop.