Courses: Introduction to GoldSim:
Unit 14 - Modeling Discrete Events
Lesson 4 - Understanding Event Triggering
In the previous Lesson we started to discuss how GoldSim provides a mechanism for you to generate discrete events. But in order for this to be of any value, there has to be a way for these events to affect your model in some way. This is done by providing some elements with the ability to take a particular action in response to an event. Specifically, this is accomplished by providing the ability for some elements to be triggered to respond to an event. When you trigger an element, you are telling it that a discrete event has occurred that you want the element to respond to.
Of course, not all types of elements can be triggered, and those that can be triggered each respond in a different way (appropriate to that element). Those elements that can be triggered, however, are all triggered in the same way. That is, these elements all share a common Triggering dialog, which controls how they are triggered. The Triggering dialog is always accessed via a button in the dialog for each element. (In some elements, this button will be labeled as Trigger…, but in others it will be labeled differently.)
You have actually already seen the Triggering dialog. One of the elements that can be triggered by an event is the Stochastic element. A Stochastic element responds to an event by resampling itself when it is triggered. In Exercise 18, we caused a Stochastic to be resampled every day.
Let’s explore the triggering of a Stochastic again in order to learn more about the Triggering dialog. We will start by opening the simple Timed Event example you built in the previous Lesson (you should have saved it to the “MyModels” subfolder of the “Basic GoldSim Course” folder on your desktop as TimedEvent.gsm).
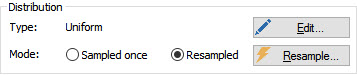
Now let’s add a Stochastic element. You can leave it at its default definition (dimensionless, Uniform distribution between 0 and 1). By default, the Triggering dialog for a Stochastic is not available. To make it available, you need to change the Mode to “Resampled”. When you do so, the Resample… button becomes available:
The Resample… button provides access to the Triggering dialog. Open that now and press the Add button to add a trigger. You will note that under Type there is a drop-list to select the trigger type:
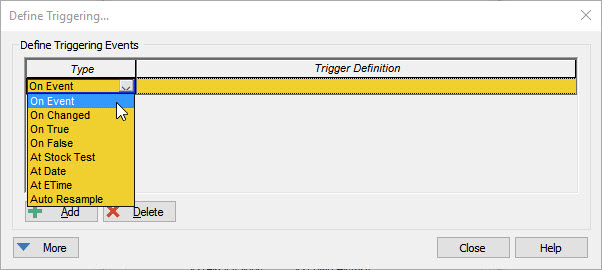
Select the first item in the list (“Event”). When you do this, the Trigger Definition only accepts discrete signal outputs. The element will be triggered whenever the specified event occurs.
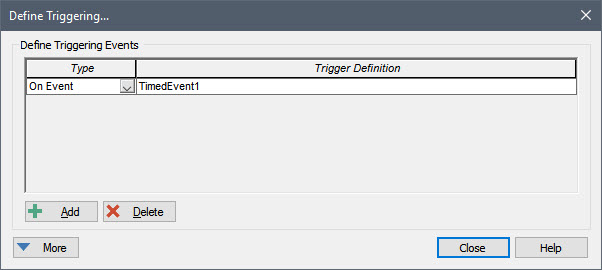
We discussed discrete signal outputs in the last Lesson. They are produced by a number of different elements. We saw that the primary output of a Timed Event element is a discrete signal, so let’s enter that now (i.e., just enter the name of the Timed Event element):
Your model will now look something like this:
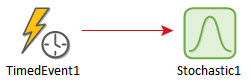
Note that the influence (the arrow) connecting the two elements is red. In previous models, these were black or green. This is because the colors of influences can be controlled such that they reflect the type of information being passed. By default, conditions are green, values are black and discrete signals (events) are red. This is helpful, as it allows you to know something about the model simply by glancing at the model in the graphics pane.
Run this model and plot a time history of the Stochastic. You will note that it is resampled whenever the event occurs.
Before closing the result display, convert it to a Time History Result element (name it Stochastic History), since we will look at this result several more times in this Lesson. Recall that to do this you need to press the Edit Properties… button (the farthest button to the right at the top of the display), and then press Create Element.
Let’s now return to Edit Mode and explore some of the other triggering options.
Edit the Stochastic element and open up the Triggering dialog again. From the drop-list, change the Type from “Event” to “On Changed”. When you do this, the Trigger Definition accepts any Value or Condition output in the model (it does not accept discrete signal outputs). You may recall that this is the option we selected when we resampled the Stochastic every day in the previous Unit. When this option is selected, the element is triggered whenever the output in the Trigger Definition changes. This option is most commonly used in conjunction with the Run Properties (introduced in Unit 6, Lesson 9).
Run Properties allow you to reference variables that track things like the number of elapsed days, the month of the year, or the day of the week. In Exercise 18 in the previous Unit, we referenced the Run Property DayofWeek. This changes every day, and hence by doing so we triggered the Stochastic to resample every day. Enter DayofWeek into the Trigger Definition and rerun the model. Double-click on the Stochastic History Result element and you will see that the Stochastic is resampled every day.
Return to Edit Mode again, and now insert a Reservoir element. Name it Fuel, and define it as follows:
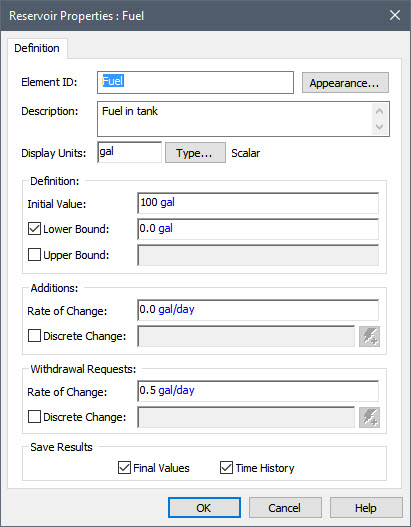
So this represents a tank of fuel that starts with 100 gallons, and empties at a rate of 0.5 gal/day.
Edit the Stochastic element and open up the Triggering dialog again. From the drop-list, change “On Changed” to “On True”. When you do so, the Trigger Definition only accepts Conditions. It can be a Condition output or a conditional expression. Enter the following expression:
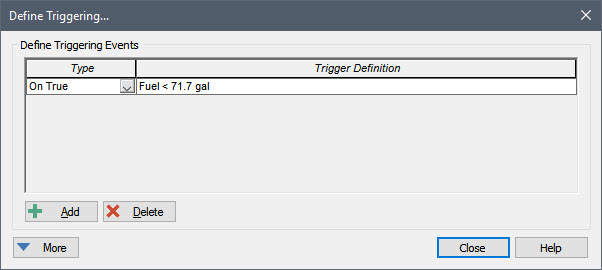
Now rerun the model and double-click on the Stochastic History Result element. You will see that the Stochastic is resampled only once (around 57 days). The important thing to note here is that “On True” does not mean “If True”. The “On True” trigger is “pulled” when the condition becomes true, not when it is true. In this example, it only becomes true once (and then remains true for the rest of the simulation). An “On True” trigger can be “pulled” multiple times, but in order for that to happen, the condition would need to become false again (e.g., if the tank was refilled).
(Note that the “On False” trigger option is simply the opposite of the “On True” trigger: it is “pulled” when the condition becomes false).
You may recall that when we created this example in the previous Lesson, we checked the Include unscheduled updates (high resolution results) in scalar time histories in the Advanced Time Settings dialog in order to view unscheduled updates and see exactly when the event actually occurred. Let’s look at a table view of this result now (press Table in the display dialog):

It appears that this event occurred at exactly 57 days (i.e., that is when the value was resampled and hence changed). But you could calculate by hand that this would actually happen at 56.6 days. We mentioned in the previous Lesson that if events do not fall exactly on a scheduled update (timestep) of the model (in this case, exactly every 1 day), they cause an “unscheduled update” of the model in between the scheduled updates. So why didn’t GoldSim insert a timestep at that point? The discussion in the previous Lesson was with regards to events generated by Timed Event elements. In that case, GoldSim does indeed insert a timestep. However, when you use an “On True”, “On False” or “On Changed” trigger, GoldSim does not insert a timestep. It only evaluates the “Trigger Definition” every scheduled timestep.
Fortunately, if you do want GoldSim to insert a timestep precisely when a condition becomes True (or False), you can do so using a different trigger Type: “At Stock Test”. Return to Edit Mode and make that change to the Resampling trigger now:

The “At Stock Test” option is similar to the “On True” option with two key differences: 1) the conditional expression must compare a Reservoir or a Pool to some value; and 2) GoldSim inserts a timestep when the condition becomes True. Rerun the model and double-click on the Stochastic History Result element and view the table display:
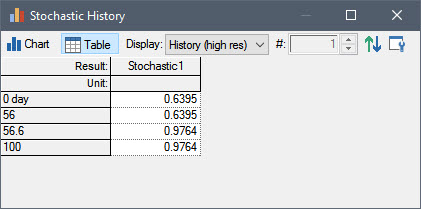
As can be seen, in this case, GoldSim does insert a timestep (at 56.6 days).
There are two additional trigger options in this list that should be noted here also: “At Date” and “At ETime”. In these cases, you must enter a date string (e.g., “30 December 2017”) or an elapsed time, respectively, in the Trigger Definition, and the event will be triggered (obviously only once) at the specified date or elapsed time. In both of these cases, GoldSim inserts a new timestep (if the date or elapsed time does not fall on a scheduled timestep).
Note: You can define multiple triggers of different types. So for example, if you defined both an “At Stock Test” trigger and an “At ETime” trigger, both would be used (i.e., two different things would trigger the element).
You now know the basics of event triggering. In a subsequent Lesson, we will discuss some advanced triggering options (options accessed via the More button on the Triggering dialog). You can also read more about triggering in GoldSim Help.