Courses: Introduction to GoldSim:
Unit 14 - Modeling Discrete Events
Lesson 3 - Generating a Timed Event
To begin our exploration of discrete event modeling in GoldSim, let’s experiment with generating an event by defining one that occurs based on a specified rate of occurrence (which can be assumed to be either regular or random).
GoldSim provides a specialized element to do this, referred to as a Timed Event. Let’s start with a new model and insert a Timed Event element now. You will find the Timed Event under the element category “Events”. The dialog looks like this:
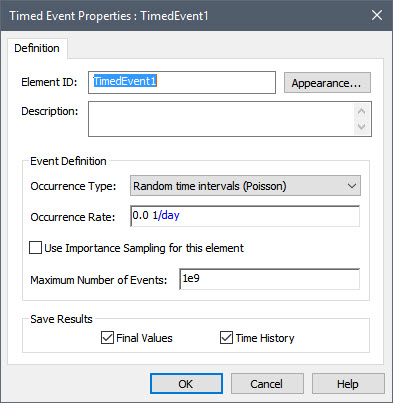
The first item that must be specified is the Type. This is a drop-list consisting of the following options:
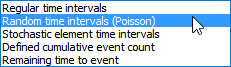
We are only going to focus on the first two (the latter three are advanced options that are beyond the scope of this Course).
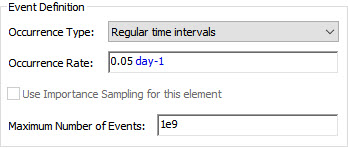
The default is “Random time intervals”, but for now, select “Regular time intervals”. Having done so, we next have to specify the Occurrence Rate. Let’s select once every 20 days. This could be entered either as “1/20 day” or “0.05 day-1”:
Now let’s run the model (recall that by default, a new model is set to run for 100 days with a 1 day timestep).
After running the model, let’s examine the outputs of the Timed Event. Recall that we can view all of the outputs of an element by left-clicking on the output port for the element (the green box on the right-side of the element).
When you left-click on the output port for an element, it shows an output interface with all of the element’s outputs (indented under the element name). What you will note here is that there is one output that has the same name as the element itself, and then a second output (named “EventCount”):
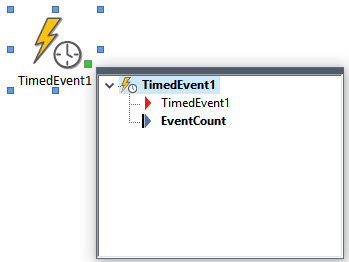
As discussed in Unit 7, Lesson 2, the output with the same name as the element is referred to as the primary output. The other output is referred to as a secondary output. We can plot an output by right-clicking on it. Try to do that now for the primary output (i.e., the first in the list). You will note that if you right-click in the primary output, nothing happens! What is going on? We will come back to that at the end of this Lesson. For now, let’s right-click on the secondary output (EventCount) and then left-click on Time History Result…. The following chart will be displayed:
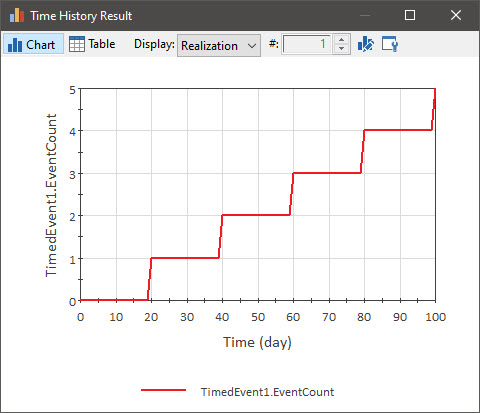
The EventCount output is simply an integer that represents the cumulative number of events emitted. Since we specified that this event was to occur once every 20 days (regularly), that is exactly what we see.
Close the display and return to Edit Mode. Open the Timed Event and change the Type to “Random time intervals”. Then rerun the model and plot the EventCount output again. It will look something like this:
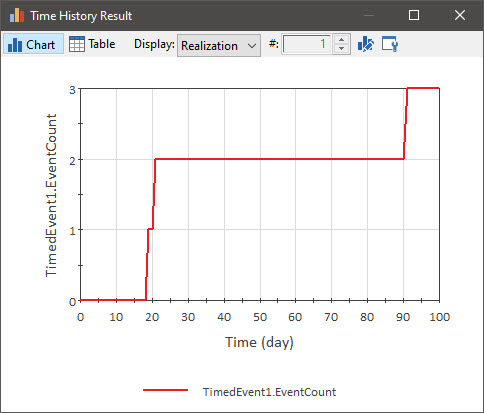
For the reasons discussed in the previous Unit (different random numbers), your result will look different but will behave similarly: the events will be randomly spaced. When “Random time intervals” is chosen, the events occur randomly, but over any time period T, the expected (mean) number of occurrences is T * Occurrence Rate.
Before closing this result display, convert this to a Time History Result element. Recall that to do this you need to press the Edit Properties… button (the farthest button to the right at the top of the display), and then press Create Element.
One way to see how “Random time intervals” work is to increase the simulation Duration (in the Simulation Settings dialog) to, say, 100,000 days. When you do so (and view EventCount), you should see close to 5000 events occur.
Note: When “Random time intervals” is selected, GoldSim treats the event generation as what is referred to as a Poisson process. A Poisson process has been used to describe seemingly random processes in a large number of disciplines. Mathematically, in a Poisson process, the intervals between events are exponentially distributed.
It should be apparent that using a Timed Event in this way provides you with another way (in addition to the methods described in the previous Unit) to represent a stochastic process.
In the simple Timed Event example we are working with, return to Edit Mode (but make sure you created the Result element first as discussed above). If you did the little experiment above (running the model for 100,000 days), make sure you reset the Duration to 100 days.
Recall that in this model, we had a 1 day timestep. Does that mean that when “Random time intervals” is chosen, the events occur randomly, but exactly on a scheduled (in this case, daily) timestep? No, this is not the case at all. If events do not fall exactly on a scheduled update (timestep) of the model (in this case, exactly every 1 day), they cause an unscheduled update of the model in between the scheduled updates. The probability of the events falling exactly at multiples of a day is essentially zero. The events occur in the middle of the various days.
We discussed the concept of unscheduled updates in detail in Unit 7, Lesson 4. In that Lesson we showed that Reservoirs cause an unscheduled update (i.e., a new timestep) to be inserted between scheduled updates whenever they reach an Upper or Lower Bound (Pools do the same thing). Events behave similarly: they cause an unscheduled update to be inserted when they occur.
Recall, however, that unscheduled updates do not appear in time history plots and tables. That is, although these timesteps may affect the results (e.g., by making them more accurate at the scheduled timesteps), unscheduled updates of the model are not saved and plotted. Only the scheduled updates are actually saved and plotted. But you may also recall that there is a way to see the impact of the unscheduled updates. In particular, there is an option (primarily used when debugging models) that instructs GoldSim to plot the unscheduled updates. Make sure you are in Edit Mode, and open the Simulation Settings dialog (F2). Then press the Advanced… button in the lower right-hand corner of the dialog. The following dialog will be displayed:

Check the box to Include unscheduled updates (high resolution results) in scalar time histories. Then press OK twice to close the dialogs.
Now re-run the model, double-click on the Time History Result element, and press the Table button:
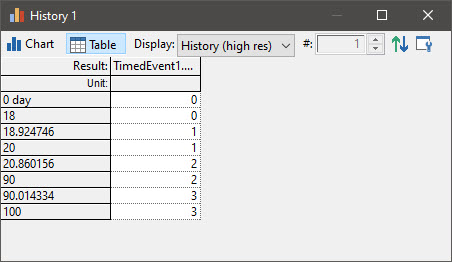
Again, for the reasons discussed in the previous Unit (different random numbers), your result will look different but will behave similarly: you will see events inserted between the daily timesteps.
Before we complete this Lesson, let’s return to the primary output of the Timed Event. If you left-click on the output port for the element in Result Mode, and then try to display the result for the primary output (i.e., the output with the same name as the element) by right-clicking on it, we saw that nothing happens. So what is going on here?
The reason is that this particular output cannot actually be displayed because it is not a value (i.e., a number). It is something a bit more complex: a discrete signal. Discrete signals are a special category of outputs that transmit information discretely, rather than continuously.
To understand what we mean by this, recall that we noted in the previous Lesson that once an event is generated, a variety of GoldSim elements can be triggered by the event, with each element responding to the event (taking a particular action) in a different manner. This means that it is necessary for discrete signals to propagate between elements.
If you think carefully about this, you will realize that this is very different from how all the other kinds of information we have discussed thus far is passed between elements in GoldSim. For the elements we have seen so far, information is transferred between them (via links) continuously in time. For example, if Expression element X is defined as being equal to A + B (where, A and B are perhaps other Expression elements), the values for A and B are continuously sent to X (i.e., the information is "broadcast" through the link at every timestep throughout the duration of the simulation). That is, at any given time in the simulation, X is receiving information from A and B. If A does not change, X simply receives the same value at all times. If A changes, a new value is passed at the next timestep. Hence, at all times during a simulation, valid values for A and B exist that can always be sent to X.
In order to propagate events between elements, however, it is necessary to send information intermittently as a "spike" or discrete "packet" of information. In between events, there is no information to send at all. Hence, a discrete signal is not a number; it is a signal that is sent between elements (at a specific instant in simulated time) indicating that something (e.g., an earthquake, a bank deposit, an equipment failure) has occurred precisely at that instant, to which the element needs to respond.
So once we generate an event (as we shall see, the Timed Event is just one way to generate an event), the discrete signal output provides a mechanism that allows that event to be propagated to another element which can then be triggered to respond in some way. We will start to discuss how some elements can be triggered to respond to events in the next Lesson.
Before we do so, however, let’s save the simple example (with the Timed Event) that we have been working on, as we will briefly revisit it in the next Lesson. Save it to the “MyModels” subfolder of the “Basic GoldSim Course” folder on your desktop (call it TimedEvent.gsm).