Courses: Introduction to GoldSim:
Unit 14 - Modeling Discrete Events
Lesson 7 - Exercise: Complex Triggering
Now that we have learned about triggering events and one of the most important elements that respond to events (Discrete Change elements), in this Unit we will do an Exercise that builds on that knowledge.
The model will simulate a pond that has a continuous inflow of water, as well as discrete additions and withdrawals:
- The model should be set up as a Calendar Time model with a Start Time of 1/1/2018, an End Time of 1/1/2019, and a one day timestep.
- The pond starts empty and has a constant inflow rate of 1 m3/day.
- There is a discrete addition of 60 m3 every month (use the On Changed trigger with “Month” as the argument).
- There is a discrete withdrawal that occurs randomly once every 50 days, but only in July through December (the withdrawal does not occur January through June). The amount withdrawn is sampled from a Normal distribution with a Mean of 200 m3 and a Standard Deviation of 40 m3.
Stop now and try to build and run the model.
Note: Making the event occur randomly, but only in July through December is a bit tricky (and we have not discussed how to do such complex triggering yet). See if you can figure out how to do this. If not, don’t worry, we will discuss it below.
Once you are done with your model, save it to the “MyModels” subfolder of the “Basic GoldSim Course” folder on your desktop (call it Exercise22.gsm). If, and only if, you get stuck, open and look at the worked out Exercise (Exercise22_ Complex_Triggers.gsm in the “Exercises” subfolder) to help you finish the model.
Your model should look similar to this:
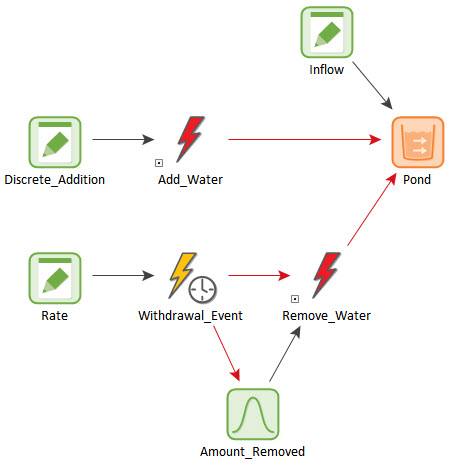
The first thing you should notice is that the inputs (i.e., the inflow, amount of the discrete addition and the rate at which the random withdrawal occurs) are represented using Data elements. As has been pointed out previously, it is poor practice to bury inputs inside elements. All inputs should be defined using Data elements (or other Input elements such as Stochastics).
The constant continuous inflow rate is straightforward and need not be discussed further here. The discrete addition is also relatively straightforward. The Discrete Change element should look like this:
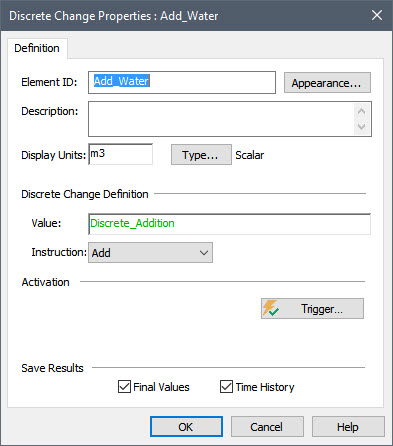
Note that the Value field is simply a Data element (defined as 60 m3).
The trigger for this element should look like this:
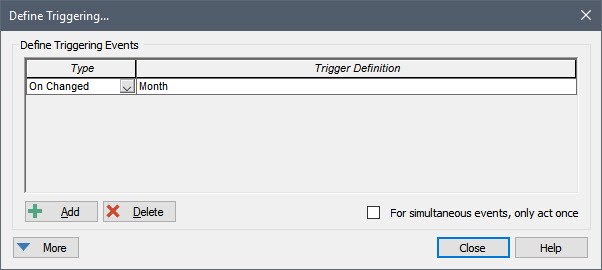
Recall that “Month” is a Calendar Time Run Property that varies from 1 to 12 (we used this Run Property in Unit 11, Lesson 4).
The tricky part of this model is defining the discrete withdrawal. The first thing we need to do is define the random event. This is done using a Timed Event element:
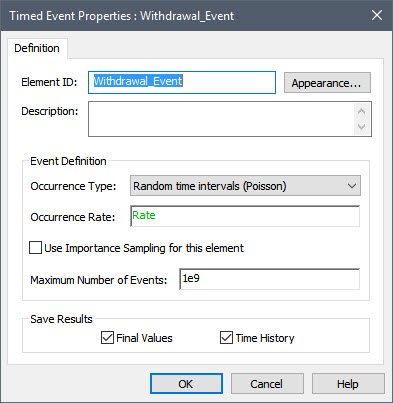
Note that the Occurrence Rate field is simply a Data element (defined as 1/50 day).
The Timed Event triggers a Stochastic (the Normal distribution) to resample itself every time the event occurs. Otherwise, every discrete withdrawal within a particular realization would have the same Value.
The Timed Event also triggers a Discrete Change element:
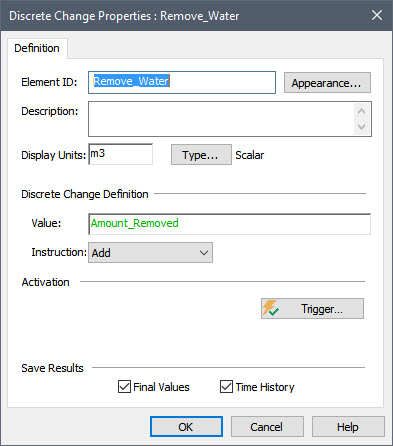
The Value is the Stochastic that is being resampled. Let’s now look at the trigger for this element:
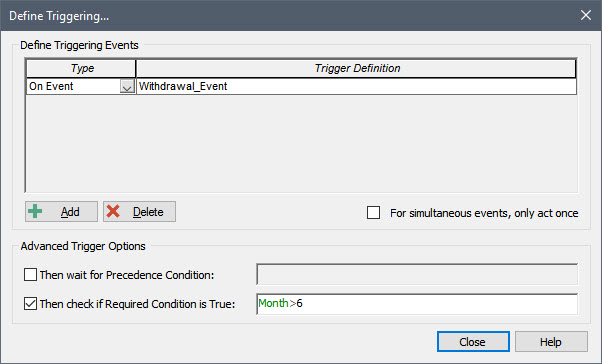
Trigger dialogs have a More button. If you press it, it expands the dialog and displays some Advanced Trigger Options. We are using one of these here. We first check the box labeled Then check if Required Condition is True.
When you check this box, the Required Condition field becomes available. The field accepts any condition output or conditional expression. If the condition is True when the triggering event occurs, the element is triggered; otherwise it is not triggered (i.e., the triggering event is ignored). In our case, we want to ignore all events that occur in the first six months. Hence, the condition simply refers to the Month.
If you run this model, the results should look similar to this:
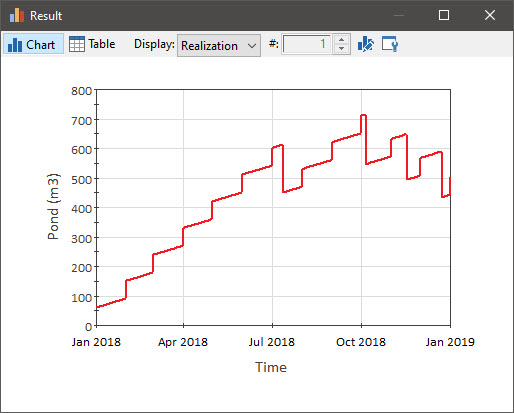
If you built the model yourself, the results will not be identical, since the events are random and your model will use different random number seeds. However, the overall behavior will be the same: there will be a random number of withdrawals (with random quantities) during the last six months, but no withdrawals at all during the first six months.
It should be noted that that there is a second Advanced Trigger Option available that we did not use here: Then wait for Precedence Condition.
When you check this box, the Precedence Condition field becomes available. The field accepts any condition output or conditional expression. The triggering of the element is “held” until the specified Precedence Condition is met (the Condition becomes True), and then the element is triggered. Hence, unless the Precedence Condition is met at the time that the triggering event occurs, the element could be triggered after the actual triggering event has occurred. Note that this behavior is quite different than the Required Condition behavior. If a Required Condition is not True when the element is triggered, the triggering event is ignored. But if a Precedence Condition is not True when the element is triggered, the triggering event is not necessarily ignored; it is “held” (remembered”) until the Precedence Condition becomes True.
It should be clear that the combination of multiple types of triggers (e.g., On Changed, On True, On Event, etc.) combined with these Advanced Trigger Options provide tremendous flexibility, enabling you to represent very complex triggering logic.