Courses: Introduction to GoldSim:
Unit 13 - Probabilistic Simulation: Part II
Lesson 4 - Exercise: Autocorrelating a Stochastic
In the previous Lesson we built an example in which a Stochastic element (representing an inflow rate) was resampled every day in order to represent a stochastic process (e.g., due to weather). We noted that every day the value was resampled and could change from being very low one day to very high the next.
If you think about what is likely to cause the daily variation in flows in this simple example (e.g., runoff from rainfall), you might conclude that large changes from day to day may not be realistic. That is, perhaps the day to day values should be correlated to some extent (e.g., if the value is very high today, it is unlikely, but not impossible, to be extremely low tomorrow). Of course, this may not always be the case. You could come up with examples of stochastic processes in which the successive values are not correlated. But in many cases, successive values certainly will be correlated.
GoldSim provides a mechanism to represent this. To illustrate this, let’s open the Example we created in Lesson 2. You should have saved it as Example22_Resampling.gsm in the “MyModels” subfolder in the “GoldSim Course” folder. If you did not, you will find it in the “Examples” subfolder.
After opening that model (and making sure it is in Edit Mode), copy the “Stochastic_Process” element (Ctrl+C) and paste it (Ctrl+V). Rename the new element “Stochastic_Process_Auto”. Then press the More button to expand the dialog. In the previous Unit (Unit 12, Lesson 10) we used the Correlation section of this dialog to correlate one Stochastic element to another. In this example, we will use the Correlation drop-list to specify that this element is “Autocorrelated” (with a Value of 0.9):
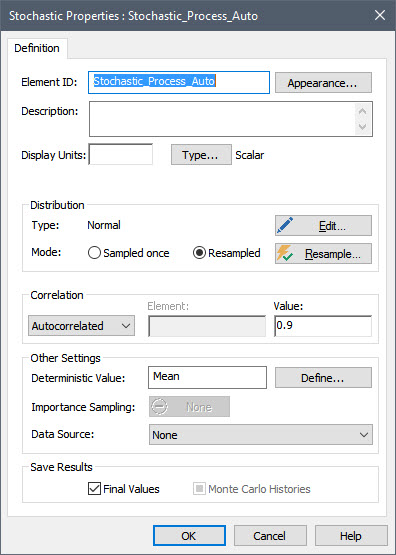
Note: If a Stochastic is being resampled, the only option here is “Autocorrelated”.
Now close the dialog, add this element to the Time History Result element, and run the model.
The result will look similar to this (again, due to different random numbers, yours will look different, but the pattern will be the same):

You can toggle through the other realizations to see that the pattern is similar.
What you will notice here is that the autocorrelated Stochastic still can vary widely over the simulation, but it does so much more smoothly (i.e., if the correlation coefficient is high, it rarely jumps from one extreme to the other). This is what autocorrelation does – tomorrow’s value is likely to be close to yesterday’s value. For many stochastic processes, this is the most realistic way to describe their behavior.
But how do you know if the resampled Stochastic should be autocorrelated in this way (and how do you determine the value for the correlation coefficient)? It is beyond the scope of this Course to describe how this is done (since it is done outside of GoldSim as a pre-processing step), but suffice it to say that if you had a time series of data (e.g., daily flow rates in a river), standard statistical techniques could be used to determine the degree of autocorrelation.
Before we leave this Lesson, let’s do a quick Exercise on a more physically-based model. We are going to start with the Exercise we built in the previous Lesson. You should have saved a model named Exercise19.gsm. Open the model now. (If you failed to save that model, you can find the Exercise, named Exercise19_Overflow_Stochastic.gsm, in the “Exercises” subfolder of the “Basic GoldSim Course” folder you should have downloaded and unzipped to your Desktop.)
Recall that this model simulated a pond that received an inflow described as a stochastic process (the distribution was resampled every day). The pond has an Upper Bound, and when the volume reaches that level, it overflows into two other ponds (70% to one and 30% to the other).
Recall that the plot of the Inflow for this model looked like this:

The point to note here is that every day a new value is sampled, and it is possible for the value to be very low one day and very high the next day.
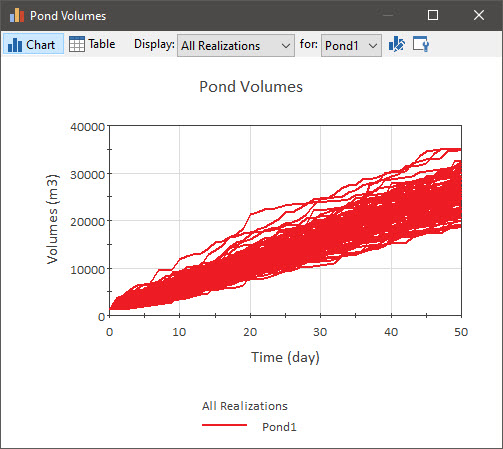
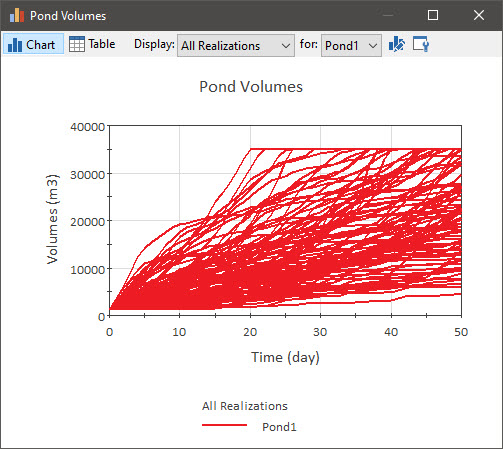
The results (for the Pond Volumes Time History Result element, viewing “All Realizations”) looks like this:
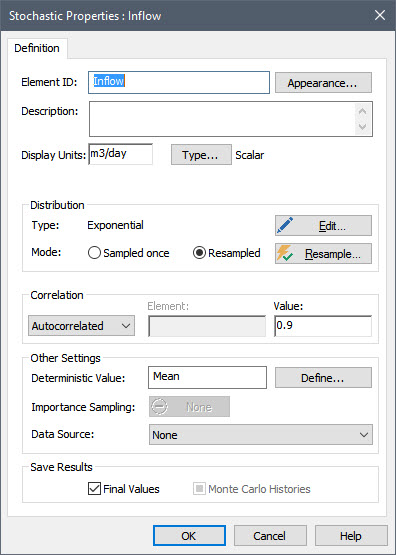
We are going to make one simple change to this model: we will assume that the Inflow is autocorrelated with a Value of 0.9.
Stop now and try to build and run the model.
Once you are done with your model, save it to the “MyModels” subfolder of the “Basic GoldSim Course” folder on your desktop (call it Exercise20.gsm). If, and only if, you get stuck, open and look at the worked out Exercise (Exercise20_ Overflow_Autocorrelated.gsm in the “Exercises” subfolder) to help you finish the model.
The only change to this model is to set the Stochastic to be autocorrelated. The dialog should look like this:
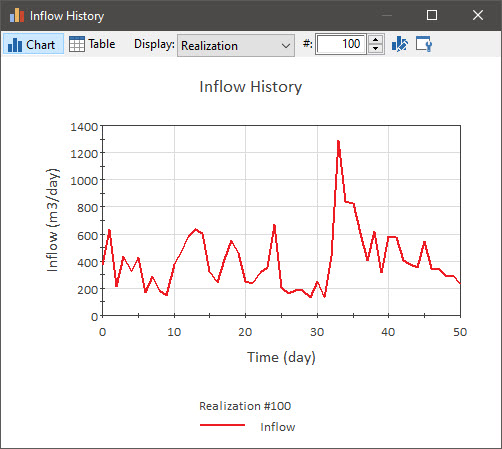
If you browse through the realizations for the Time History element displaying the Inflow (with Display set to view a single “Realization”) you will note that the realizations behave in a “smoother” way (they don't jump so abruptly from one value to another):
How does this affect the pond volume? The results (for the Pond Volumes Time History Result element, viewing “All Realizations”) looks like this:
This is an interesting (and perhaps non-intuitive) result! Although the autocorrelated Inflow behaves more “smoothly” than when it is not autocorrelated, the Pond volume actually exhibits a wider range of behaviors here than when the Inflow was not autocorrelated (but a narrower range of behaviors than when the Inflow was not resampled). So what is happening here? When the Inflow is not autocorrelated, it is unlikely that multiple high (or low) values will be sampled in series. Hence, although the Inflow jumps around, it tends to converge back to the mean value. However, when the Inflow is autocorrelated, it is possible (in fact, likely) to have many high (or low) values sampled in a row. As a result, the Inflow does not converge back to the mean value as strongly, and the volume therefore exhibits a wider range of behaviors.
This series of simple Exercises has shown how significantly stochastic processes can impact the behavior of systems, and how ignoring them (e.g., treating the Inflow as a constant), or treating them unrealistically (e.g., not autocorrelating the Inflow) can result in drastically different behavior.