Courses: Introduction to GoldSim:
Unit 13 - Probabilistic Simulation: Part II
Lesson 6 - Representing a Stochastic Process: Randomly Sampling a Time Series
In the previous Lessons in this Unit we explored the simplest way to represent a stochastic process: resampling a Stochastic element. Although this method is powerful and useful for many situations, in some cases it may not be the most appropriate. For example, it could be difficult to properly represent complex seasonal or diurnal patterns within a stochastic process using a resampled Stochastic (even with autocorrelation).
As a result, GoldSim provides several other methods to represent stochastic processes. We will discuss one such method in detail in this Unit (and briefly mention two others).
The method we will discuss here uses historic time series data that you enter using a Time Series element. To understand this method, we need to revisit a topic from Unit 11. In particular, in Unit 11, Lesson 7 we showed how you could import historic time series data into a Time Series element (e.g., 100 years of daily rainfall).
We then pointed out that when we import historic data, by definition, it will be imported using calendar-based dates from the past. But most simulations look forward in time (i.e., we build simulations to predict what will happen in the future). For example, if we had 20 years of daily temperature data (e.g., from 1990 to 2010), and wanted to use this data in a 2 year simulation (e.g., from 2017 to 2019), how would we do that? In the simulation, the Time Series would need to specify values from 2017 to 2019 (not 1990 to 2010). Obviously, in order to use this data, we would need to shift it. That is, we need to shift the data from historic dates to future dates (e.g., assume 2017 will be identical to 1990).
We pointed out in that Lesson that GoldSim provides an option to time shift the data in a specified manner. This feature is provided in the “Advanced” section of the Time Series dialog, accessed via the More button. To refresh our memory on what we did back in Unit 11, let’s look again at the pre-built model we used in that Lesson. You will find this model in the “Examples” subfolder of the “Basic GoldSim Course” folder you should have downloaded and unzipped to your Desktop. In that folder, open a model file named Example17_TimeShifting.gsm.
This is a very simple model consisting of a single Time Series element. If you explore the model, you will note the following:
- If you look at the Simulation Settings dialog, you will see that the simulation is set to run for 10 years (1/1/2017 to 1/1/2027), with a 1 day timestep.
- The Time Series represents daily flow rates in a river from October 1923 to October 2010 (there are almost 32,000 data points!). The units are in “cfs” – cubic feet per second.
You will note that in the Time Series dialog, the dialog has been extended and the “Advanced” section is visible (this section becomes visible by pressing the More button, and if some advanced options have been selected cannot be hidden). The “Advanced” section looks like this:
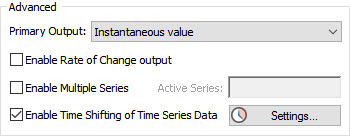
You will note that the box next to Enable Time Shifting of Time Series Data is selected (this is why the Advanced section is visible and cannot be hidden). Press the Settings… button next to this field and the following dialog will appear:
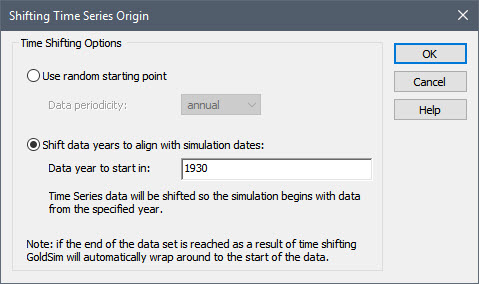
This dialog allows you to define how the data is to be time shifted. GoldSim provides two different ways that Time Series can be shifted. The option being used here for time shifting the Time Series is to Shift data years to align with simulation dates. This option shifts the time series data such that the simulation begins by mapping data from the specified Data year to start in to the simulation Start Time.
In this example, the Data year to start in is set to 1930. Recall that the Simulation Start Date was 1 January 2017. As a result, GoldSim treats the data set such that the data point corresponding to 1 January 1930 would be used for 1 January 2017 (and, because daily data was entered, the data point for 2 January 1930 would be used for 2 January 2017, etc.). Because this is a 10 year simulation, what this means is that the period from January 2017 to January 2027 will be assumed to behave exactly like the historic period from January 1930 to January 1940.
Simply using historic data in this way (for flow rates) generates stochastic behavior in the model, since the historic data itself is stochastic in nature. However, there is a problem with this approach. If you ran the model for multiple realizations, the flow rate would have the exact same history every realization. As a result, we are not truly representing the stochastic nature of the flow rate, as every realization behaves like 1930 through 1940.
However, there is another Time Shifting option in this dialog that allows us to better represent this stochastic process. In particular, the Use random starting point option randomly samples a starting point in the data set for each realization.
To understand how this works, select that option now. When you do so, the Data periodicity drop-list becomes available:
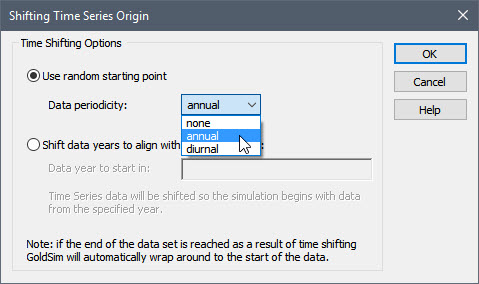
If the Data periodicity is “none”, for each realization GoldSim randomly picks a point from within the total span of the time series data, and assumes that this time point corresponds to an elapsed time of zero (i.e., the simulation Start Time). In most cases, this is NOT what you want to do, as it means the date-time of the data is not respected.
More frequently, you would specify the Data periodicity to be “annual”. In this case, GoldSim ensures that each random starting point respects the month, day and time of the simulation Start Time (although due to leap years, there could be a one day difference in some realizations). In this model, for example, for the first realization, GoldSim might randomly choose a starting point such that January 2017 to January 2027 is assumed to behave exactly like the historic period from January 1935 to January 1945. For the second realization, it then might randomly choose a starting point such January 2017 to January 2027 is assumed to behave exactly like the historic period from January 1992 to January 2002, and so on. Since the data set contains 87 different possible starting points (i.e., there are 87 data points with a date of January 1), there are 87 different 10 year time histories that can be randomly generated using this data set.
Note: If the sampled start date was toward the end of the data set (e.g., 2008) such that there were not 10 subsequent years to use, GoldSim would “wrap” the data around and return to the start of the data set. That is, it would use 2008, 2009 and 2010, and then wrap around back to 1923 for additional data to complete the 10 years of simulated time.
To see this, make the following changes to this model:
- Select Use random starting point with a Data periodicity of “annual”.
- Create a Time History Result element and add the Time Series element to it.
- Edit the Simulation Settings so that the model runs for 100 realizations.
Then run the model, open the Time History Result element, and change the Display to “Realization”. Then step through the 100 realizations. You will see that each realization uses a different 10 year historic period (actually, since we ran 100 realizations and there are only 87 different 10 years histories that can be used, some will be repeated).
This method provides a very powerful way to represent stochastic processes that have seasonal behavior using historical data.
Note: The third option for Data periodicity (“diurnal”) is used for simulations in which you need to respect diurnal variations in historic data (e.g., temperature) over the time frame of days (instead of months or years). In this case, GoldSim ensures that each random starting point respects the hour, minute and second of the Simulation Start Time.
You can read more about time shifting Time Series elements in GoldSim Help.
Before closing our discussion of representing stochastic processes in GoldSim, it is worth pointing out two other methods that GoldSim provides:
- You can define a series of random events that can occur in a model (e.g., equipment failures, accidents, financial transactions) that have the effect of generating stochastic behavior. We will discuss this in some detail in Unit 14.
- GoldSim provides an advanced element called a History Generator. This element can be used to generate a wide variety of stochastic time histories based on specified statistical measures (e.g., growth rate, volatility). It is particularly useful for representing financial and economic variables (but has applications in many other arenas) that can be described as being controlled by either a random walk or geometric growth process. We will not discuss this advanced feature in this Course, but you can learn more about it in GoldSim Help.