Courses: Introduction to GoldSim:
Unit 13 - Probabilistic Simulation: Part II
Lesson 8 - How Many Realizations Are Enough?
Before discussing more GoldSim features, we need to discuss one final “theoretical” question that commonly occurs to people when they start carrying out probabilistic simulations. The good news is that this is the last “theoretical” Lesson in the entire Course!
We’ve noted repeatedly that due to differences in random number seeds, probabilistic results can differ. This immediately raises the question: “How good are my results, and how many realizations do I need to run to be accurate enough?”
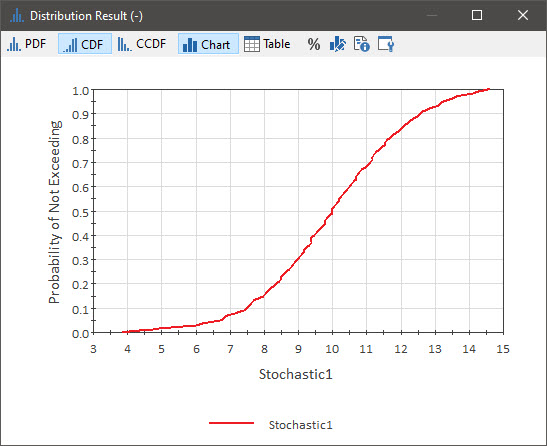
To answer this question, let’s look at a very simple example. Start with a new model, and add a Stochastic element. Make it dimensionless (no Display Units) and define it as a Normal distribution with a mean of 10 and a standard deviation of 2.
Edit the Simulation Settings so that the number of realizations is 50. Now run the model, right-click on the element and select Distribution Result… Next press the Chart button:
Now press this button at the top of the Chart display dialog:

The result will now look like this:
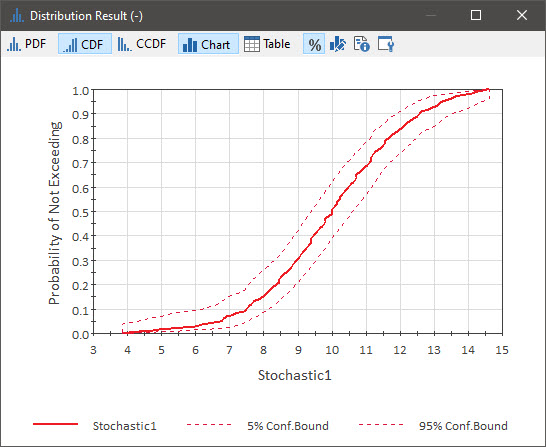
Pressing the button added confidence bounds to the display. The confidence bounds on probabilistic results can be readily computed based on the number of realizations. They represent the 5% and 95% confidence bounds on the percentile (i.e., there is a 90% chance that the true value lies between the bounds).
Note: GoldSim cannot accurately compute the confidence bounds beyond the range of the sampled values. So the displayed confidence bounds at the extreme tails of the distributions are actually too narrow. For example, in this case, you will see that the lower confidence bound curve becomes vertical at approximately 14.5. This is not correct. It actually should extend far to the right.
Note: When there are relatively few uncertain variables, LHS (discussed in the previous Lesson) can increase the accuracy of the result distribution, but the computed confidence bounds are not able to reflect this improvement, and hence will be conservatively wide in this case.
In the example above, this result indicates that our best estimate for the median (the 50th percentile) is about 10 and there is a 90% chance that the median is between approximately 9.5 and 10.5 (the points where the two dashed lines intersect the value of 0.5 on the y-axis). That is, given the number of realizations, there is a 5% chance that the median is below 9.5 and a 5% chance that it is above 10.5. So in this example, our 5/95 confidence in the 50th percentile has a range of about 1.
Now look at the 90th percentile. What you will notice is that the distance between the two dashed lines is greater toward the tails of the distribution. In particular, in this example, our best estimate for the 90th percentile is about 12.6 and there is a 90% chance that the 90th percentile is between approximately 11.8 and 13.7 (the points where the two dashed lines intersect the value of 0.9 on the y-axis). So in this example, our 5/95 confidence in the 90th percentile has a range that is almost twice as wide as that for the 50th percentile.
What this shows is that for a given number of realizations, we have less confidence in the percentiles toward the “tails” of the result distribution (i.e., very low and very high percentiles) and more confidence in the percentiles toward the center of the distribution. If you think about this, it makes sense: percentiles toward the “tails” of the distribution are defined by a smaller number of samples than percentiles toward the middle. In this case, since there were 50 realizations, 5 landed outside of the 90th percentile. Hence, that percentile is being defined by 5 samples.
What this discussion indicates is that the number of realizations required is a function of what specific question(s) you are trying to answer with the model. If you are interested only in the median or the mean (the Statistics portion of the summary distribution result displays the 5% and 95% confidence bounds on the mean), you may not need a large number of realizations to achieve high confidence in the value (i.e., a small range between the 5% and 95% confidence bounds). On the other hand, if you were interested in a high percentile (e.g., if you wanted to know the 99th percentile with high confidence), you would need a larger number of realizations. As a very general rule, you would typically want on the order of 10 realizations outside of the percentile to define that percentile with high confidence (which would mean that to compute the 99th percentile, you would need on the order of 1000 realizations).
Return to edit mode, change the number of realizations to 500 and rerun the model. Right-click on the element and select Distribution Result…, press the Chart button, and display the confidence bounds again:
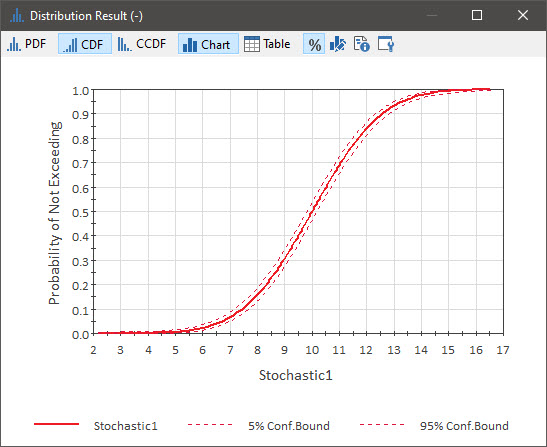
The x-axis range here is larger, since we ran more realizations and hence sampled more extreme values. If you would like, you could change the x-axis to vary over the same range as when you ran 50 realizations (between 3 and 15 in this case; this could be different for you) so you can compare it directly to the previous display:

In either case, You can see how that our confidence in the results has increased considerably.
So now you know how to determine how many realizations are required to accurately define a particular percentile. But how do you know what percentile you really need to accurately compute? This is a function of the nature of the system, the possible outcomes/consequences you are trying to simulate, and the overall purpose of the simulation. Are you primarily interested in “expected” or “average” outcomes, or are you interested in possible extreme (and highly consequential) outcomes? In the latter case, the required percentile is also a function of the risk tolerance of the decision-maker using the model (i.e., it is a policy issue).
In some cases, the mean (or median) value might be an appropriate measure for a decision-maker (e.g., if you were trying to model mean wait times in a queue, or the expected outcome of a simple financial analysis). In other cases, however, mean or median values would be highly inappropriate measures, as they would mask “low-probability, high-consequence” outcomes. For example, if you were designing a water reservoir for which some catastrophic consequence (e.g., a dam failure) occurred if the water level exceeded a certain value, you would want to run enough realizations to demonstrate that the probability of that occurring was below a particular (policy-based) value. In this case, if the policy (which could be based on a regulation) was that “the probability of dam failure over the next 10 years must be less than 0.1%”, then you would need to accurately estimate the 99.9th percentile of the peak water level.
In most risk analyses studies of complex engineered systems, the most interesting (i.e., consequential) behavior is at the tails of the result distribution. That is, the system was specifically designed to work well at least under expected conditions (and hence is likely to do so). However, under extreme (relatively rare) conditions perhaps it could behave poorly (even catastrophically). In these cases, it might be necessary to run a large number of realizations in order to resolve any “low-probability, high-consequence” outcomes.
Note: GoldSim has several advanced options to modify the conventional Monte Carlo approach so that the tails of distributions (which could correspond to “low-probability, high-consequence” outcomes) are sampled with an enhanced frequency. This is referred to as importance sampling. This topic, however, is beyond the scope of this Course. If you are interested, you can read about these options in GoldSim Help.
Ok, we are done with theory! Now we will close this Unit by returning to several “hands-on” practical discussions (including describing several more options on the Monte Carlo tab).