Courses: Introduction to GoldSim:
Unit 16 - Documenting Your Model
Lesson 2 - Organizing Your Model
The most important way to ensure that your model is easy to explain and understand is to spend some time to organize it.
When you begin to design your model, you should always have in mind the audiences to whom you will be presenting or explaining the model. Most models will have at least two audiences:
- a high-level audience (managers and decision-makers who are primarily interested in the "big picture" or "bottom line"); and
- a low-level audience (analysts who are also interested in the technical details and assumptions of the model).
Often, there will be multiple low-level audiences, which are interested in different technical aspects of the model. There may also be a "mid-level" audience, which is interested in more than the "big picture", but does not want to get lost in the details.
For a model to be successful (i.e., useful), you must be able to present and explain your model effectively to all of these audiences. The primary way in which you accomplish this is by organizing your model into a logical, top-down hierarchy. Containers provide the mechanism in GoldSim by which you can create well-organized, hierarchical models. In most cases, you do this by placing model elements in a “top-down” containment hierarchy in which the level of detail increases as you "push down" into the hierarchy.
In a well-organized model, you can imagine that each Container has a specific "message" and a corresponding audience at which it is targeted. For example, a model's highest level Container might have the following message: "This is the problem I am trying to solve, and here is the overall structure of the model I have built to solve it". Such a Container would be intended for all audiences.
Another Container's message in the model might be "Here are the detailed assumptions regarding process X". This Container's audience would be the analysts or technical personnel interested in that particular aspect of the model. You "hide" these details in a Container, because they are of no interest to higher level audiences (e.g., managers). Those who are interested, however, can “drill down” to view the contents of the Container.
Note, however, that there is no single correct way to organize a model using Containers. To illustrate this, let’s open an Example model. You will find this model in the “Examples” subfolder of the “Basic GoldSim Course” folder you should have downloaded and unzipped to your Desktop. It is named Example33_OrganizingModels.gsm. This model contains three localized Containers (we discussed localized Containers in Unit 10): "No_Hierarchy", "By_Component" and "Inputs_and_Stocks". Each represents the exact same model organized in different ways.
Note: This model is not intended to be run (as none of the inputs are meaningful). It is only being used here to illustrate different ways for organizing a model.
Let’s start looking inside the Container named No_Hierarchy:
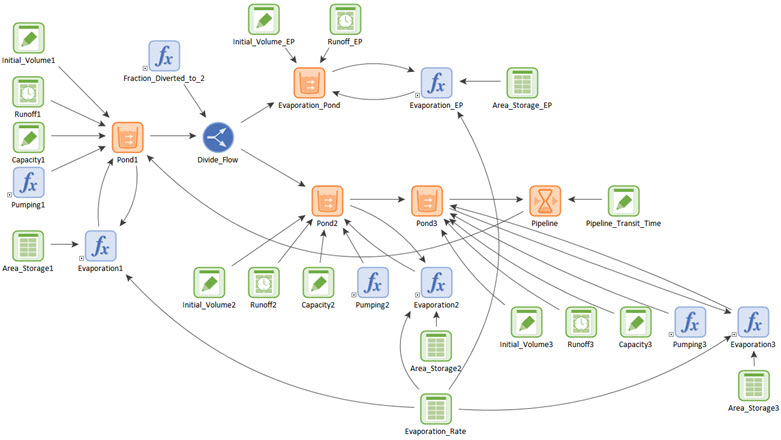
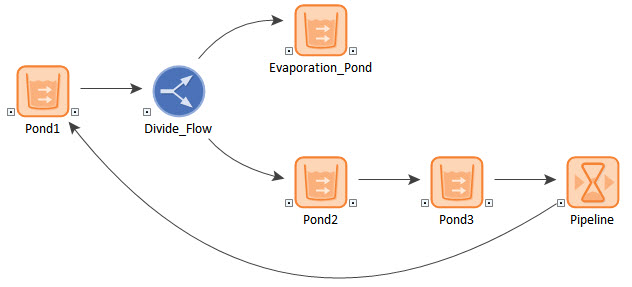
This is a simple water management model. The primary components are four ponds (Pond1, Pond2, Pond3 and Evaporation_Pond) and a Pipeline though which water flows. Conceptually, the model is actually quite simple. What makes the model so complex-looking at first glance is that all of the inputs for each of the five primary components are all in the same Container with those components. It makes the graphics pane very difficult to understand.
There are two different (but equally effective) ways we could use Containers to organize this model in a much more effective manner.
The first is illustrated by the Container named By_Component. Look inside that Container. The contents of this model are identical to the contents of the No_Hierarchy model. The model is simply reorganized as follows:
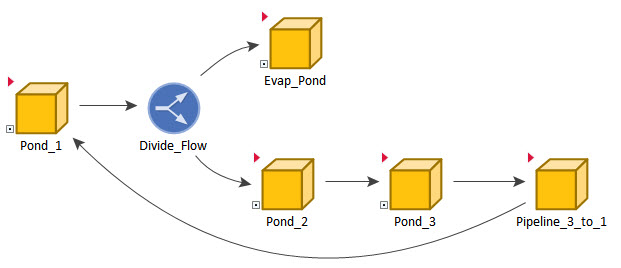
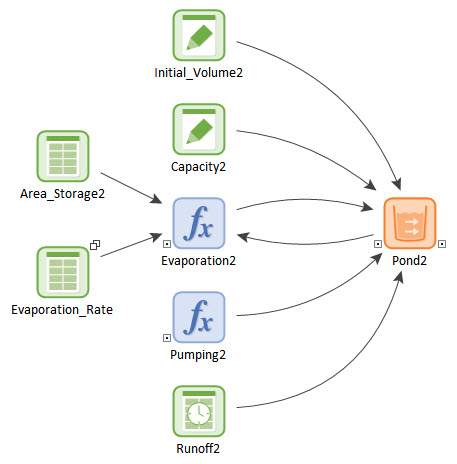
There is a separate Container for each of the primary components (and its auxiliary calculations and inputs). The inside of a component Container (e.g., for Pond_2) looks like this:
Clearly, this model is much easier to understand than the first one!
Note: You may notice that the Evaporation_Rate element has a symbol in the upper right-hand corner that we have not seen before. This indicates that this element has been cloned. We will discuss this in Lesson 9 and how it can be used to better organize models.
Although this approach can work quite well for some models, for others, it may not. In particular, if there are multiple logical connections between the various primary components (e.g., Pools) via intermediate auxiliary calculations, the actual movement of material (e.g., the influences representing the flow of water) can be masked by a “spider web” of influences between the Containers.
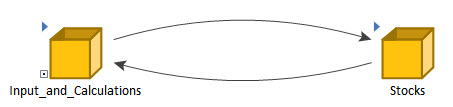
Fortunately, there is also a very different way to organize such a model. Instead of creating a separate Container for each of the primary components (and its auxiliary calculations and inputs), we could instead just create two Containers. The primary components would be in one Container and all of the inputs and auxiliary calculations would be in another. This is what we find in the Inputs_and_Stocks Container (go inside that Container now):
Again, the contents of this model are identical to the contents of the No_Hierarchy model.
The Container for the primary components (Stocks) look like this:
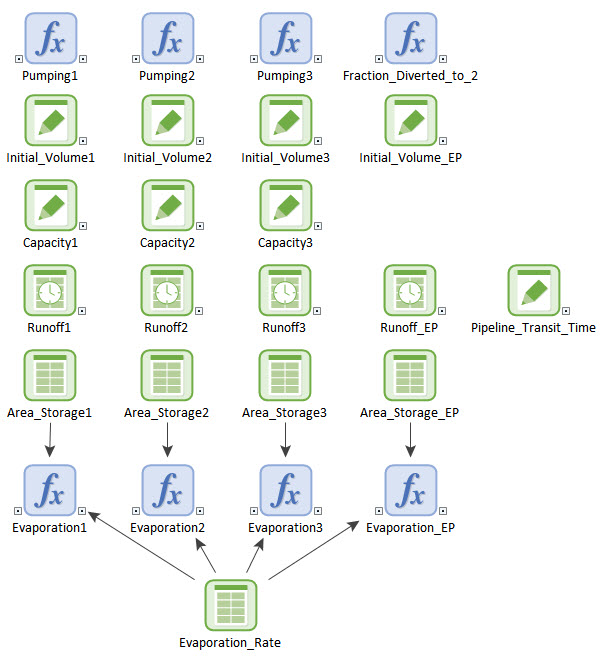
The Container with all of the inputs and auxiliary calculations (Inputs_and_Calculations) looks like this:
Clearly, this model is also much easier to understand than the original one (No_Hierarchy). It also has the advantage of highlighting the “flows” of material or information (in this example, the flow of water) between the primary components.
The point here is that Containers can be used to organize your models in different ways and you should think carefully about how you organize your models. Different parts of the model may be organized in different ways, and there is never one “best” way to organize a model. Your goal, however, should be to create a model structure that makes your model easy to explain and present to multiple audiences.
Note: You can always add Containers and move elements between them after your model has been built. In fact, it is quite common to reorganize a model multiple times as it is being built.