Courses: Introduction to GoldSim:
Unit 4 - Building a Simple Model
Lesson 3 - Stating the Problem and Entering Data
We are now ready to build our model. The first step when creating any simulation model is to first clearly state the problem we want to solve, explicitly identifying the input assumptions and exactly what is to be calculated. In this case, our model is very simple: We are filling a tank with water. The tank starts empty, and we fill it at a rate of 30 liters/min for a period of 2 days. The tank has a capacity of 30,000 liters. Unfortunately, the tank leaks. It leaks at a rate that is linearly proportional to the volume of water in the tank. In particular, 15% of the tank volume leaks per hour. We want to calculate the volume of water in the tank over the next 3 days.
Our first step in building the model is to enter the input data:
- Initial flow rate from hose = 30 liters per minute
- Tank capacity = 30,000 liters
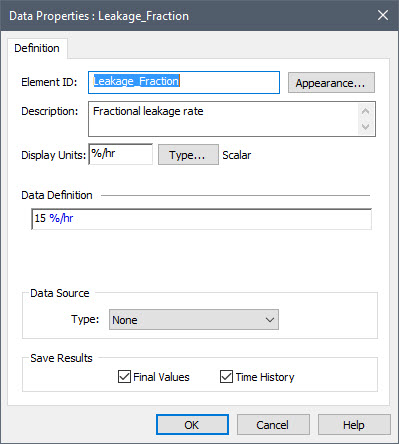
- Fractional leakage rate = 15% per hour
There is actually a fourth piece of data, the time that we turn the hose off (2 days). For now, however, we will only deal with the first three pieces of data; we’ll deal with that fourth item in the next Lesson.
We will enter this input data using Data elements. Data elements are used to enter inputs that are constant (i.e., do not change with time) and deterministic (i.e., we are assuming we know the actual values with no uncertainty).
So to start, let’s create the initial flow rate from the hose:
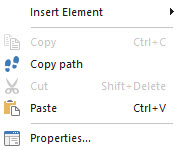
- Right-click in the graphics pane in the approximate location where you want to place the Data element. The following menu will appear:
- Now place your cursor over “Insert Element” and another sub-menu will appear. In that sub-menu, place your cursor over “Inputs” and you will see the following:
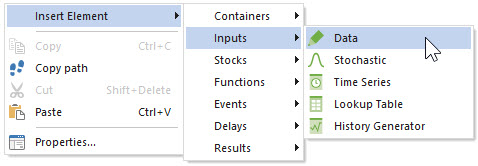
- Left-click on “Data”. This will insert a Data element and immediately display the dialog for that element:

- The first thing we want to do is change its name (the Element ID). We will talk about naming rules in the next Unit, but for now you should just note that the names cannot have spaces, but can use the underscore “_” character. So let’s name this element Hose_Flow_Rate.
- Next we will give it a Description (Inflow rate into the tank for the first 2 days).
- One of the most powerful features of GoldSim is that it understands units and dimensions. (We will also discuss this in detail in the next Unit.) Whenever we create an element in GoldSim, we specify the units. In this case, our units are liters per minute. The correct abbreviation for this is l/min (note that this is the letter “l”, not the number “1”). This should be entered in the Display Units field.
- Finally, we will enter the value (with units) of 30 l/min in the field marked Data Definition.
- The dialog should look like this:

- Press OK to close the dialog.
You can now repeat the process for the Data element representing the tank capacity. When it is complete, it should look like this:

For the third Data element, we will use an alternative method for inserting an element:
- One of the toolbars provided by GoldSim at the top of the screen is the Element toolbar. Each button in the toolbar represents a different element category:
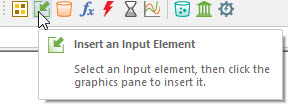
Left-click on the button corresponding to the element category of interest (in this case Inputs). A menu will be displayed showing all of the elements in that category:
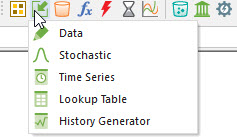
- Left-click on the element type that you wish to insert (in this case, Data). When you do so, the cursor will change and will look like this:

- Move the cursor to where you wish to place the element and left-click. The properties dialog for the element will be displayed. Enter the inputs for the Leakage_Fraction. When you are done, it should look like this:
- When you press OK to close the dialog, you will note that the element has been inserted in the graphics pane with its upper-left corner at the location of the cursor when you left-clicked.