Courses: Introduction to GoldSim:
Unit 4 - Building a Simple Model
Lesson 4 - Defining the Inflow Rate to the Tank Using an Expression Element
We are now ready to define the inflow rate to the tank. Recall that we plan to fill the tank at a rate of 30 liters/min for a period of 2 days. In the previous Lesson we created a Data element for the flow rate during the first two days. Now we need specify that the hose is turned off after 2 days.
How do we do that? What is required is an “If-then” statement. “If-then” statements are part of all programming languages, and as GoldSim (like a spreadsheet) can be thought of as a high-level programming language, it also supports this functionality. “If-then” statements have three parts:
- A condition/question (which is either True/Yes or False/No);
- The result if the condition/question is True/Yes; and
- The result if the condition/question is False/No.
In this example, what is the condition/question? It is simply the question “are we currently in the first 2 days of the simulation?”. If the answer is Yes, we want the inflow rate to be equal to the Hose_Flow_Rate that we defined in the previous Lesson. Otherwise, we want it to be zero.
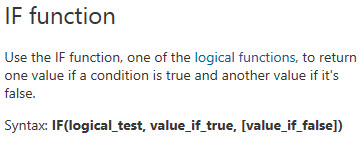
In a spreadsheet, you would write such an “If-then” statement like this (this is the Help screen describing the IF function in Microsoft Excel):
We can do something very similar in GoldSim. To do so, we will use an Expression element.
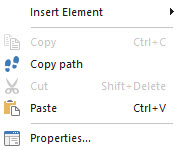
- Right-click in the graphics pane in the approximate location where you want to place the Expression element. The following menu will appear:
- Now place your cursor over “Insert Element” and another sub-menu will appear. In that sub-menu, place your cursor over “Functions” and you will see the following:

- Left-click on “Expression”. This will insert an Expression element and immediately display the dialog for that element:

Note: Of course, you could also have used the Element toolbar to insert the element.
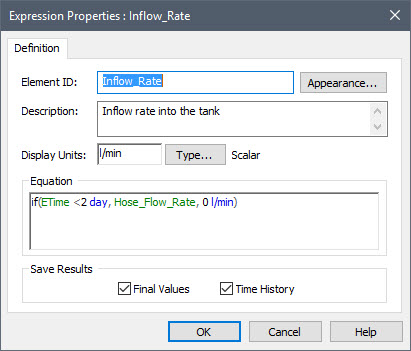
- Let’s change the name of the element (the Element ID) to Inflow_Rate.
- Next we will give it a Description (Inflow rate into the tank).
- The Display Units are l/min.
- Finally, we enter the Equation that defines the element’s value. As we noted above, this will be an “If-then” statement. Enter it like this:
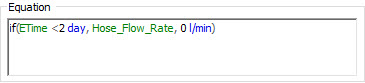
You see that just like in Excel, an “If-then” statement in GoldSim requires three arguments separated by commas. The first argument (the condition) is “ETime < 2 day”. ETime is a “built-in” variable in GoldSim that represents the Elapsed Time of the simulation. As we will discuss in subsequent Units, GoldSim has a wide variety of such “built-in” variables (referred to as Run Properties). Through variables such as these, we can directly reference time during a simulation: an essential feature when running a dynamic simulation. In this case, by doing so we can very easily ask the question “is it the first 2 days of the simulation?”.
The second argument is the result if the condition is True. In this case, we want the value to be equal to 30 l/min, which we specified as the Data element named Hose_Flow_Rate. The third argument is the result if the condition is False. In this case, we want it to be zero. Note that when specifying the value here, we need to add units (any units of volume per time would work). If you entered simply “0” without any units, GoldSim would display an error:
- When you are done, the dialog should look like this:
You can now close the dialog by pressing OK.
We have now defined the inflow rate to the pool. Although what we have just done will work, there is actually a problem with how we have defined this element. We will come back and revisit this problem shortly. For now, we can move on to the next element.
But before we do so, let’s take a quick look at the model. It should look something like this:
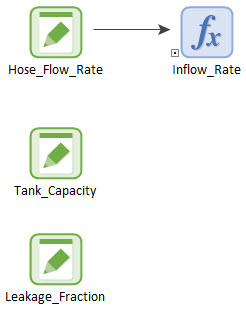
Note that when you referenced the Hose_Flow_Rate in the Inflow_Rate element, GoldSim automatically drew an arrow (referred to as an influence) between the elements.
Note also that Inflow_Rate has a small box (with a dot) on the lower-left hand side of the element. In fact, if you hold your cursor over any element, you will see that the boxes appear on both sides of the element. They are referred to as input ports and output ports, and we will discuss their purpose (and why they are displayed for some elements, but not for others and why only some ports have dots) in subsequent Lessons. For now, you do not need to be concerned with them.
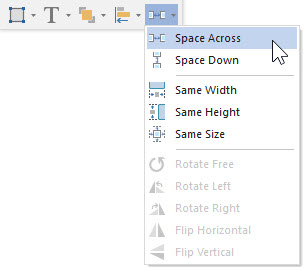
Note: You can move an element by simply left-clicking on it and dragging it. You will note that when you do so, GoldSim will snap the element to an internal grid to help you align them to make your model look neat. GoldSim also provides standard alignment and spacing tools in a toolbar:
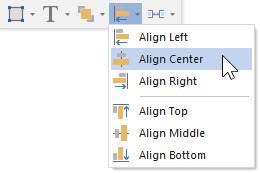
By selecting multiple elements (by selecting elements while holding down the Ctrl key, or by dragging a box around elements), and using the alignment and spacing tools in the toolbar, you can align and space elements very quickly. If you would like, try to use these spacing and alignment tools now. Note, however, that we will discuss these tools in detail in a subsequent Unit.