Courses: Introduction to GoldSim:
Unit 4 - Building a Simple Model
Lesson 5 - Creating a Pool Element to Represent the Tank
The next step in building our model is to create an element that actually tracks the amount of water in the tank. Mathematically, what we need to do is numerically integrate the inflows and outflows to/from the tank with respect to time. Doing so will produce the volume in the tank at any time τ in the future:
\(\displaystyle {\mathrm{Volume(\tau)=\ Initial\ Volume+\int_0^{\tau} [Inflow(t) -Outflow(t)]\ dt}}\)
It turns out that such integrals are almost always the critical components of a dynamic simulation model. This is because most simulation models are primarily interested in predicting the movement or changes in “stuff” or tangible things (e.g., materials, money, people, widgets), or the evolution of the state of intangible things (e.g., the price of a stock or a commodity, the public acceptance or perception of a particular policy decision).
As a result, GoldSim includes several specialized elements that compute such integrals. The most powerful of these, and the one that we will use here, is the Pool element. The Pool element is intended to track tangible things (in this case, water).
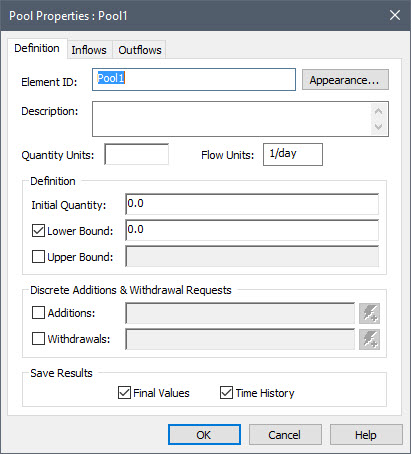
Let’s insert a Pool element. You know how to insert an element now, so we won’t bother to repeat the steps here. You will find the Pool under the element category “Stocks”. You will see that the dialog for a Pool element looks like this:
This element is named a Pool because tracking the amount of water in a pool or some other body or container of water is a classic example of its use. However, it is important to understand that there is nothing about this element that is specific to tracking water. Pools can be used to track all kinds of things (e.g., people in a city, cars in a factory, chemicals in a processing facility, soil at a contaminated site). Because it is so critical, we will discuss Pools in great detail in a subsequent Unit. For now, however, we are simply going to define the inputs necessary for this Pool to represent our tank.
The first thing you should note about this element is that the property dialog has multiple tabs. Most elements in GoldSim have a single tab. The Pool element, however, like a number of other elements in GoldSim, has multiple tabs. The default tab is the Definition tab.
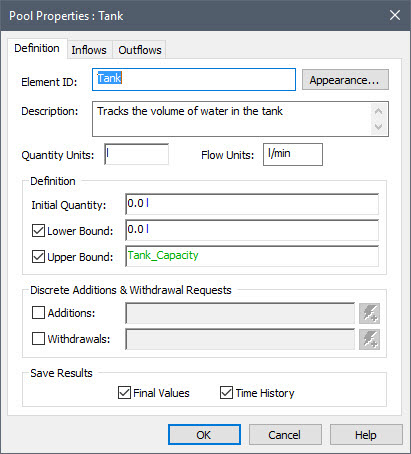
- Let’s change the name of the element (the Element ID) to Tank.
- Next we will give it a Description (Tracks the volume of water in the tank).
- Most elements in GoldSim require only a single set of Display Units. For reasons we will see in subsequent Units, however, the Pool element requires two sets of Display Units. The Quantity Units are the units of the quantity being tracked (i.e., the units of the integral itself). In this case, it will be liters (abbreviated with the letter “l”). The Flow Units are the units of the inflows and outflows being integrated. As a result, the dimensions must be those of the Quantity Units divided by time. In this case, it will be liters per minute (l/min).
- We said that the tank starts empty, so we can leave the Initial Value at its default value of 0 l.
- Because this represents a tank, we can leave the Lower Bound at its default value of 0 l. (For some applications, the Lower Bound could be defined as a positive or negative number).
- The Upper Bound is the capacity of the tank. We created a Data element representing this named Tank_Capacity, so simply type that in.
When you are done, the Definition tab should look like this:
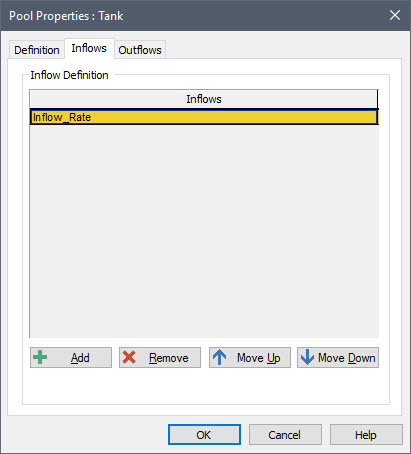
Now click on the Inflows tab. This tab is where we enter the inflows to the Tank. There is just one inflow (the Inflow_Rate that we defined previously). To add this, do the following:
- Press the Add button.
- A dialog listing all of the elements in the model will be displayed.
- Select Inflow_Rate and press OK.
When you are done, the Inflows tab should look like this:
We have specified the Inflows to the Tank, but have still not specified any Outflows. This is done via the Outflows tab. However, we won’t do that yet, and will come back to this in the next Lesson.
You can close the Pool dialog (by pressing OK).